Showing posts with label winter. Show all posts

January 31, 2017

Letters and Numbers


It’s been a gray month. Many things have not gone as planned, many things have taken my mind far from the here and now and left my heart anxious. Though I wish I didn’t have reason to be marching and demonstrating twice in one week, I am truly heartened by the thousands and millions of people who are demonstrating, calling, organizing, giving, speaking out, reaching out in opposition to the new administration and in hopes that we can still make the world a better place. I am doing my best to settle in for the long haul of political action, creative work, and family life. Somehow, in the midst of the chaos of the first month of 2017, I have found into a semblance of a routine. Most evenings I work on projects for a couple of hours and then read a bit before I can no longer avoid sleep. These projects may never go farther than the computer screen and the rooms of my apartment but I am making gradual progress, which always feels good.

Amos and I have been reading a lot of Winnie-the-Pooh in the past few days. It is the closest we’ve come to reading a chapter book and it is nice to cuddle up together to read about the friends in the hundred acre wood. Amos has been more interested in numbers and letters lately as he continues the process of learning about the world around him. We count body parts and slices of cheese and he is quick to tell us that he will be ready to go in six or thirteen minutes. I recently saw a list of beautiful alphabet posters for kids and it occurred to me that this would be a fun way for him to explore letters. Then I realized that I could make something that would do the trick.


I’ve become more interested in letters lately, too. It started with the banner I made for the women’s march (or, rally as it was at the Maine state capital). Sewing fabric letters is time consuming and not as practical or interesting as calligraphy or type face, but it is most often the medium I choose for whatever I have to say. I am drawn to words, especially words of wisdom from others. When I was in high school I had a little notebook where I would jot down quotes that I liked. Words remind me of what I want to believe, know, or understand and I make things to deepen this understanding and to interact with the world in a meaningful way. Sewing words doesn’t come close to bringing them alive, but it is a way of bringing them to my attention, of giving them greater importance. I turn fabric into words and then, slowly work at turning this words again into actions


December 16, 2016

Of Tiny and Big Things


This is the season of tiny and big things. Each morning Amos pulls a card from the advent calendar and I read him the activity that we will do (note to self: include a picture next year so he can figure it out). Making a citrus garland, cutting out snowflakes, going to see the lights on the trees in the park. We are fortunate to have the time and space and resources to make these little activities happen. As the month goes on, we will try some activities that remind us that giving, to strangers and loved ones, is important, too (collecting warm clothes and food to donate, making gifts, doing kind things).


I’ve long thought that the best way that I can make a difference in the world is in small daily actions and choosing to live in a way that, ideally, does more good than harm. But the election has prodded me to see that there is so much more that needs to be done. I think more than ever about how to encourage my children to be people who care about others, understand and appreciate the things that make us so different and so much the same. I don’t have a solid plan for any of this. I’m trying to find that spot where I can stay informed and active and not be paralyzed by fear. It is truly a privilege to be able to even consider this balance and not be forced to fight every single day. So far, I am calling my senators and congresswoman as often as I can.


Our tree is up and the ornaments move around the from day to day with Amos' whims. The needles sprinkle on to the wood floor beneath the tree and clamor to get onto the rug. I am resisting the urge to redistribute the ornaments and adjust the lights which are bunched in some areas, leaving other spots bare. I tell myself to let that go and enjoy the amazing pine-y smell and the warmth of the twinkling lights.


I had some photos printed last week and I updated the wall where I stick (literally, with masking tape) some of the photos that I love. Photos never capture the whole picture, the before or after, the mess in the background or the long journey to that quick moment. But when I look at this assortment of photos from the last several years I can see beyond the ups and downs of life with a three and a half year old, the disturbing news of the world, and the challenges of every day. These smiles, hugs, moments of sweetness really do happen every day and when I look at them I see how lucky we are that all our moments, good and hard, are held together, not by masking tape but by lots and lots of love.

January 26, 2016

Make the Best Use of It


Some days I am in the groove sitting snugly in my little boat rocking over the waves. I feel like I’ve finally arrived in a routine and rhythm that works. Without fail, I begin to believe that this is the way things will continue to go and that rough waters are behind me. Then the wind changes, the moment passes, a different day brings new and old challenges back to the surface. Early on as a parent I told myself to enjoy the good because it might be fleeting and to know that the hard parts will pass eventually and I learn this over and over again. Even if I haven’t arrived in precisely the right place or settled into the perfect routine, I am finding myself in the flow of life riding the waves as they come, trying to make the best of it or let it go.

As January nears its end, I’ve reflected a bit more on the goals and wishes that I dreamed up when the year was brand new. What I can be sure of for 2016 is that it will bring big changes (as we welcome and adjust to a new family member) and also much of the same. No matter what, I am fairly certain that this year will be more about growing as a family than anything else. I was recently reminded that the most important thing is to enjoy the journey and I resolve to do the best I can at that.

One of the more practical challenges I have set for myself this year is to do all I can to waste less. There are so many ways to approach this, but the one I am especially interested in is not so much waste less as make best use of. I want to get better at using every bit that I can before considering throwing something away (or composting, donating, or recycling, of course).

I started with citrus. First I dumped a pile of orange and grapefruit peels and rinds into a jar, covered it with white vinegar and let it sit for a few weeks. Once the vinegar is strained from the citrus, it makes for a sweet smelling cleaning vinegar. I used mine to scrub and freshen the drains in my kitchen sink. You can also turn citrus peels into candy. Before I sliced subsequent grapefruits open to devour the juicy, sweet tart fruit inside, I grated off the zest. This is a quick and easy way to get a little more out of any citrus before your peel or juice it. The zest could be mixed with sugar to make a grapefruit scented sweetener or used in a citrus salt. Store zest in the freezer for future use or save it in a jar in the fridge for a few days, as I did, before making it into a grapefruit olive oil cake.

It seems fitting that this simple cake is made with scraps that could easily be tossed aside, unused. It is perfect for any and every day and needs to embellishment and no special excuse to bake or eat.


Grapefruit Olive Oil Cake
Adapted from Good to the Grain by Kim Boyce. I love the original version of this cake but I knew it would be excellent combined with citrus as well. I used a lot of zest in this cake since I had eaten a few grapefruits during the week, if you use less the flavor will be more mild. If you prefer to zest your fruit all at once, make sure that you use the zested fruit sooner since it has less skin to protect it from drying out or spoiling. If you don't have grapefruit zest, orange or lemon zest would also be excellent.

3/4 cup whole wheat flour
1 cup all purpose flour

1/2 cup coarse cornmeal
3/4 cup sugar
1 1/2 teaspoons baking powder
3/4 teaspoon salt
3 eggs
1 cup olive oil
3/4 cup milk

zest of 3-4 grapefruits 

Preheat the oven to 350 degrees F. Rub a 9/12 inch fluted tart pan or cake pan with olive oil. 
Whisk together flours, cornmeal, sugar, baking powder and salt. In a separate bowl beat the eggs, olive oil, milk and zest. Pour the wet ingredients into the dry and stir until combined. Pour into the prepared pan and bake for about 40 minutes until deeply golden brown and a skewer inserted into the center comes out clean. Serve warm or at room temperature. It will keep for a few days. 


February 12, 2015

Pause

The world around me is piled high with snow, the renewed vigor of the start of the year has given way to ordinary clutter. It is a good time to turn inward, find renewal, and make sure we have the basics under control. Sometimes you just need a pause. In our house, that means I am trying to keep things simple as I try to help Amos sleep better. We will all be much more rested once we work through it. I decided that for the next few weeks this needs to be a priority and there are other things I can let go.

A pause is a chance to focus on the things that are essential and that really need our attention. It is also a way to slow down and take care of yourself, the things around you, and the people you care about.

When you need to pause:

Make time. Use whatever time you can find, it doesn't have to be a whole week or a whole day. Maybe you choose an evening when everyone will be home to connect around the dinner table. You could take a walk or find some quiet during your lunch break. Or, try implementing a few minutes to pause at the beginning or the end of the day. The idea is to let go of the things that are not essential and focus on those that matter most.

Deliberately let go of distractions. Turning off or putting away your phone, computer, television and other distracting devices will give you at least a few extra minutes to focus on things that matter more. Ask yourself if something is essential, if it has to be done now, or if it will make life more wonderful. If not, let it go.

Choose what you want to focus on. Depending on how much time you have, maybe you will spend an evening focusing on an important person or relationship or spend a weekend getting the rest you need. Choose what you can outsource or do ahead of time so you can really benefit from taking this time to catch up with yourself.

Prioritize taking care of yourself. It can be tempting to just veg out when you are tired and need a break and sometimes this is okay. Instead of making it a habit, though, find healthy ways to nurture yourself. Finding small moments to pause to eat a healthy meal, drink water, write in your journal, stretch or meditate or do anything that makes you feel nurtured and cared for can make a big difference.

Figuring out how to take care of yourself in the midst of busy-ness of life is a challenge. Remembering that you can pause anytime anywhere (close your eyes right now and take a deep breath) is a start and it is something you can return to again and again.

November 28, 2014

Time to be still


I took these photos a few weeks ago. Now everything is covered with snow and we've left the time of year when the leaves are gone, the light is weak and the world is in shades of gray. I love this in between season because it is still and muted, waiting but not hurried. Then the snow arrives brightening everything, laying it's cozy, festive blanket over the ragged brown grass and scattered leaves.

In this part of the world we are just on the edge of winter and I haven't yet gotten tired of the short days and the cold. I like the stillness of the woods where to do lists and obligations can be forgotten. The barren feeling that is already being eclipsed by holiday preparations, gatherings and cheer. In the midst of this season which can get way too busy, find time to be still, to appreciate, to observe.

January 15, 2014

Time and Caring

homemade body 

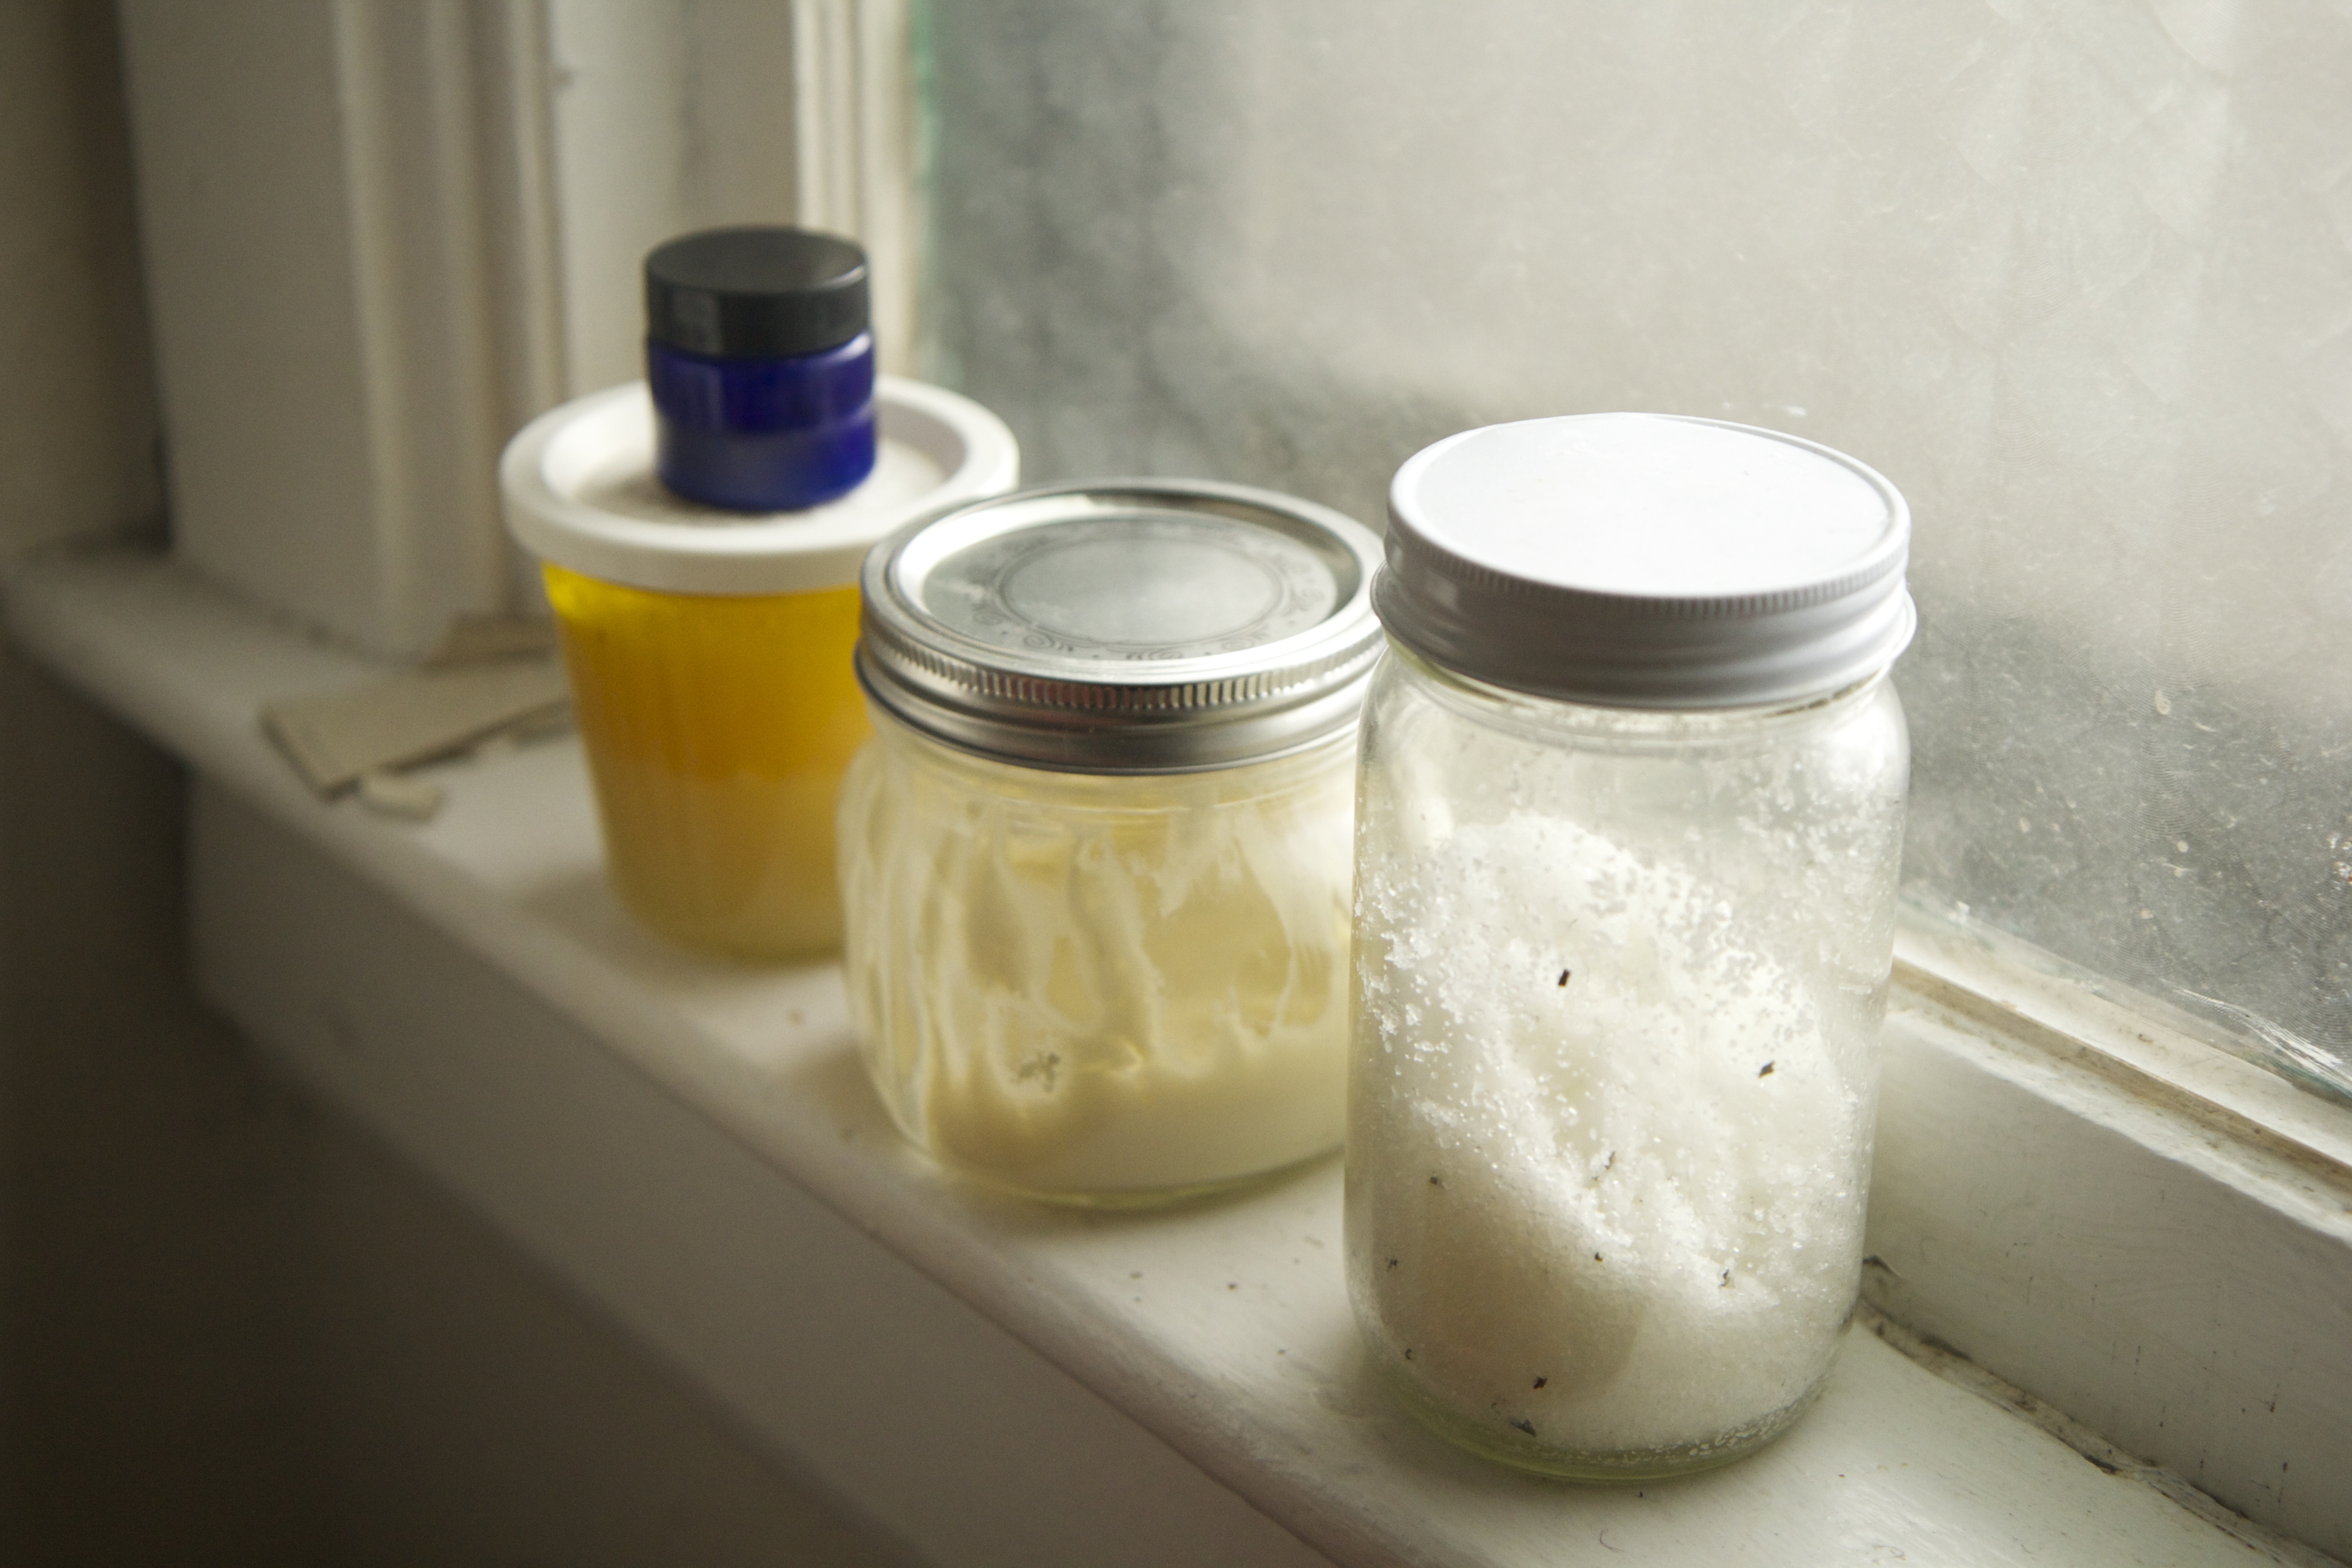
Taking care of and nourishing myself often comes in the form of cooking good food and enjoying the process of creating in the kitchen. But, in the winter the weather is harsh, the air is dry, I am usually wearing several layers and I like to do something a little extra for myself to feel good inside and out. A while back I mentioned the honey olive oil salt scrub that I have been making. This year, as Christmas gifts I also made body butter and bath salts. I enjoy having these little luxuries to use when I take a bath or to keep my skin from getting terribly dry. It might not seem so luxurious to make them myself, but I found that they are so easy to make and taking the little bit of time to round up the ingredients and mix them up is just another little spot of time and caring for myself.

They are all incredibly moisturizing and it is really a treat to have some body products that feel good to use and that I feel good about putting on my body. I find that most quality body products that I can buy either have ingredients that I don't like or are out of my price range. Although these aren't exactly cheap to make, I am certain that the cost of ingredients is far less than it costs to buy much smaller amounts of high end products. The recipes are not mine (although I am sure I will adapt them a bit as I keep making them) but I wanted to share them in case you are looking for some simple ways to treat yourself on these cold, dark, and sometimes dreary days. Of course getting outside in winter, or staying in by the stove, is wonderful but I think it might be made even better with a few little treats for your body at the end of the day.

Lip Balm - I made some peppermint and some grapefruit
Body Butter
Honey Olive Oil Salt Scrub
Bath Salts - I made rosemary and grapefruit (essential oil)

Thanks to Ashley English and Winnie Abramson for the great recipes


January 3, 2014

Lately, Lentils

The new year arrived with no fanfare. Instead we were early to bed and as late as possible to rise. I'm not one for big events on the last evening of December and, in a way, it was relaxing to not think too much about hopes, changes, or goals for 2014. Instead I have been thinking about rearranging some of the furniture and rooms of our apartment. It's true, Amos and I have been cooped up like chickens and the forecast indicates that it is only going to colder, to the point where anything much above zero is a heat wave. So, today, when the temperatures reach double digits (before the arctic plunge that is due to arrive this weekend) we will try to get outside, even just for a few minutes of fresh air.

In the meantime, I've been making lots of soup. It is something that can be so simple, so forgiving and so welcoming of all manner of ingredients and bits of leftovers, but I am quite picky when it comes to soup. I don't like often like soups that are very brothy, I prefer them pureed, thick so they almost stick to the spoon. Most often the soups that I make keep their focus on one vegetable or ingredient, accented with perhaps a few others and some spices for good measure.

I recently realized that the most satisfying, warming soups are the kinds that don't require a trip to a store. The steaming pot that  I can pull together with only the ingredients that I already have in the cupboard and the refrigerator. Lately, lentils have been the star in a favorite soup that is hearty, delicious and satisfying in all the best ways. This is the soup we ate in between making batches of peppermint bark and shipping Christmas packages. In the midst of a busy, tired, hectic day or week, it comes together with little work and does so much to revive and nourish you when you finally sit down to a warm bowl.

If, in January, you need a break from foods that are rich and sweet this soup will fill you up without a hint of austerity. Instead of feeling deprived or virtuous, you might feel grateful for simple, warm sustenance, just like I did.

carrots for soup

Lentil Soup
I adapted this recipe from Melissa Clark's Red Lentil Soup with Lemon . I've made it with brown or red lentils. I always add plenty of carrots and sometimes add a few potatoes. Soup is wonderfully flexible so you can adjust as you need to but with this recipe I always use the onions, garlic, tomato paste and cumin to give it a great base of flavor. I have to confess that I rarely have vegetable broth on hand so I usually just use water. I know that is probably very bad soup making, but if you have the broth your soup will be even better and if you don't, well, the soup will still be really good.

2 tablespoons olive oil
1 med-large onion
2-3 cloves garlic
3-4 medium small carrots
1-2 medium red or yellow potatoes (optional)
1 tablespoon tomato paste
1 teaspoon ground cumin
1/2 teaspoon salt
1/4 teaspoon freshly ground black pepper
a few sprinkles of cayenne pepper (or more to taste)
1 quart of chicken or vegetable broth or water
1 cup red or brown lentils 
1/4 cup chopped fresh cilantro (optional)

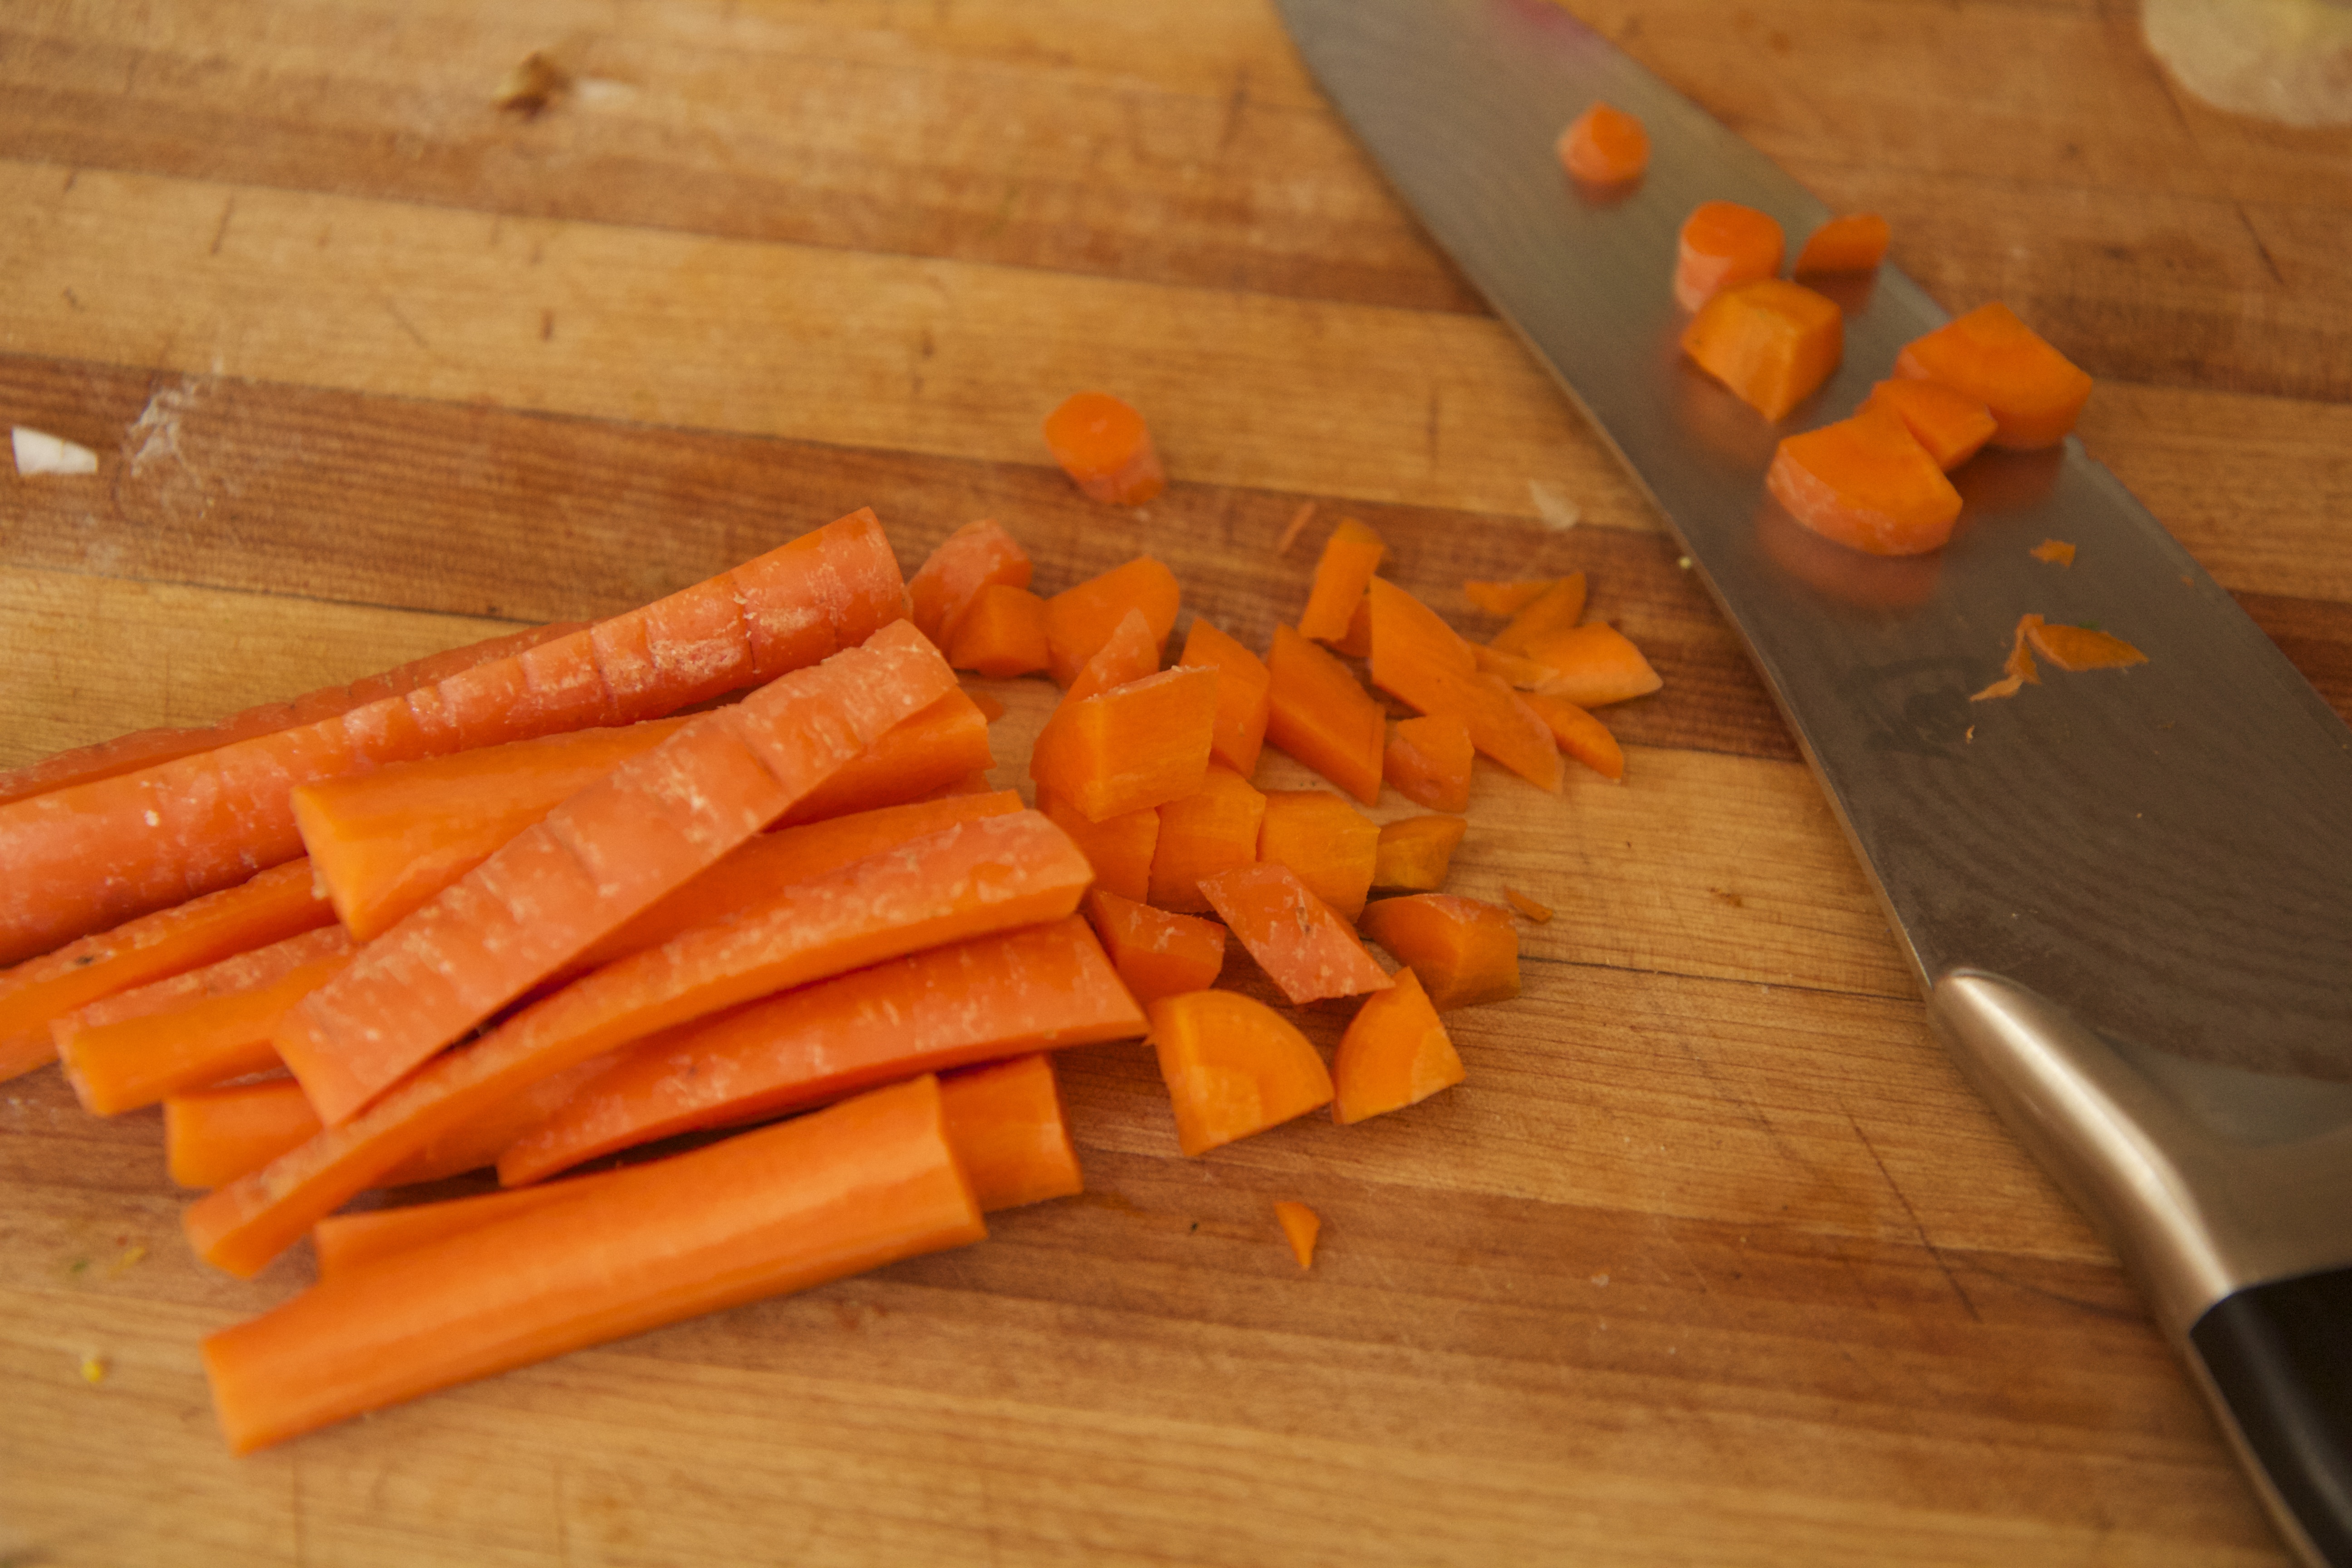
Place a soup pot over medium heat. Add the olive oil. While the pot and oil warm, dice the onion and mince the garlic. Add them to the pot and cook, stirring occasionally until the onions are golden and the garlic very fragrant. Dice the carrots and potatoes. After the onions and garlic have cooked for 3-4 minutes, add the tomato, cumin, salt, pepper and cayenne. Cook for two minutes and then add the carrots and potatoes and stir a few times. Pour in the broth or water and add the lentils. Cover and bring to a simmer. Cook, simmering, for about 30 minutes, until the lentils are soft. Puree half of the soup and stir the rest of the soup with the puree. Taste to adjust seasonings. Add the cilantro shortly before serving.

Makes about 4 bowls of soup.


March 7, 2013

In Between Time

snowy day

reflection

It seems like we have more snow now than we've had all winter. We've gotten it inch by inch and sometimes, like Tuesday, several inches in a day. Though the blanket of snow is deep in the yard in front of our building, the sun lingers until nearly six o'clock in the evening. The birds are becoming more and more vocal and this weekend we will turn the clocks to make the daylight last even later. Everything looks like winter but there are so many hints of spring.

I'm happy to stay cozy inside and nestle under a down comforter at the end of the day but then I think it will be equally nice when we can sleep with the windows open and the smell of summer air. I am eager to take more walks when the sidewalks are free of treacherous patches of ice but I also wouldn't mind going for another cross country ski. We're still working our way through food that I froze and canned last summer but I look forward to trips to the farmers' market in flip flops.

I find it hard to let go and just be in this in between time. I want to hold on to what we have now: the light of late winter, the sparkling flakes, and hearty meals. But I am eager for the slow emergence of spring with warmer days and buds on the trees. I find myself holding onto a river bank, resisting the current as it tries to carry my little vessel downstream. I'd like to release this tension, to be freed from clinging to things that must change and to simply appreciate what each day brings.

Perhaps my wish to hold off inevitable change and the anticipation of everything that is coming can't be helped. Regardless of the season or the weather, we are anticipating the arrival of our baby in three months while trying to make the most of the time we have now. Yesterday, I scanned the calendar and noted the remaining weeks, mentally calculating how much there is to do and how quickly time will slip by.  Maybe I'm not feeling the push and pull of the changing seasons. Maybe it is the tension between known, familiar, comfortable and the big changes that lie ahead. I aim to stop holding on for dear life or calculating how little free time I will have, I want to sit in the boat and go where the river takes me.

January 24, 2013

Stillness

peppermint tea


Although I know I should get outside everyday, I am pretty sure that if there were ever a few days to hibernate these would be the ones. We've had a few days this week when the temperature didn't rise above zero and I'm not sure if we've reached double digits since last week. Though I wish for a wood stove to hibernate next to, I am immensely grateful for the heat that seeps steadily from the big old radiators in our apartment. I huddle as close as I can to the hot pipes that we fuel with rent money instead of an axe and our sweat.

These are the days I think of in August. When, in the summer, the days are long and full with produce to can and freeze and the sense that there is always more to do and experience before the summer fades. Not that I would complain about a summer day, but just that I want to appreciate these cold days for their stillness, their lack of urgency. And, in turn, as I peer at the top shelf of the cupboard to choose a jar of jam, I appreciate the work of the summer and the luxury of three or four jams to choose from and no need to leave the house.

winter window

stay warm

I've also been keeping warm with a bit of knitting, a great lentil soup, ever satisfying no knead bread, peppermint tea and a few laughs. Have you been hibernating?

January 16, 2013

Slowly Returning

sink

bread

counter

waffles

January feels like a time for hibernating: hunkering down and conserving warmth. But it also signifies, to me, a new beginning. A time for increased attention to and activity in areas that may have been neglected for a while, or never engaged in at all. We are in the depths of winter. Outside is still, frozen except the sun moving across the sky or flakes of snow fluttering down from the heavy clouds. I know we have months before spring arrives but I am also certain that the time will slip away without hesitation. I am determined to use as much of each day as wisely as I can.

When I write about the seasons and the days, an ever present theme that I often return to, I imagine myself living someplace where I am much closer to nature. Instead of gazing out my kitchen window at the alley, parked cars, and garage doors, I look out at a snow covered field edged by leafless trees cutting a line between gray sky and white ground. The view from my urban kitchen is of tree branches and buildings, cement and sky layered together.

I've been slowly returning to kitchen routines as I settle into the calm light of January. During the fall I was usually too busy, tired or uninterested to do much cooking but I am finally ready to reconnect with the routines that are as nourishing in practice as they are on a plate. It is the routine of creating the staple foods that I want to have on hand in the kitchen which connects  me with what I eat. It makes me feel more alive to be part of this nourishing rhythm. 

March 7, 2012

Late Winter Pantry (and freezer)

Last week we finally had a taste of winter, with snow, slush, flurries and chilly temperatures. As usual in early March, this week's weather feels completely different. Yesterday the sun was genuinely warm, the air smelled of spring and the sidewalks were flooded with puddles and patches of mud. Today is still warm, but rainy. I've never lived anywhere that the weather was consistent and could be counted on to behave as expected, but this late winter early spring can be especially full of surprises.

The days are getting longer, birds are chirping in the morning and it seems like spring is slowly arriving. It will still be months before anything green and edible comes out of the muddy ground here. Luckily we are still eating the food that stored up last summer and fall. The freezer is no longer stuffed full, but I am glad that we still have frozen fruit and some frozen vegetables left. I was a little nervous about freezing so much broccoli but I've discovered that this frozen broccoli tastes just as good roasted and fresh broccoli does.

Our pantry shelves are emptier, but we still have lots of jars of tomatoes, dilly beans and enough salsa that we don't have to worry about buying any for a while. I am sure that my investments of time, energy and food this summer have paid off throughout this winter and we have relied on these stores for delicious meals as much as possible.

(not a pretty picture, but there's lots of good stuff in here!)

Did you eat from food you stored this winter? Are you looking forward to preserving in the coming seasons?

December 23, 2011

DSC_0120


Almost all of the baking is done, gifts are sent or wrapped, and I'm spending more time reading, knitting, and sitting in an armchair. I hope that you are finding lots of twinkling lights on these dark nights and plenty of warmth, too. I am giving myself the last week of the year to relax and do very little work, so I'll see you soon after January first. I'll miss all those year end round ups, but here are two that I enjoyed.

Wishing you the happiest of celebrations, whatever they may be!

December 7, 2011

Giving

Giving


An abundance of gift guides are popping up all over blogs and websites. When it comes to giving, the main guidance I would like to share is that, ideally, giving will be fun and part of the joy of the season. Our holiday celebrations this year will continue to be small and low key, but I plan to thoroughly enjoy the preparations. This week I am finishing up some custom orders and a few other things for the shop, but by Friday I hope to be in Christmas making mode.

Just as writing a letter is a way to spend time with someone from afar, a handmade gift is imbued with the love and joy that I want to give. Making or finding the gift is half the fun, giving it and experiencing the way that it is received is equally gratifying. I'll will miss out on most of this second half of giving, but I am still looking forward to putting together packages and cards for friends and family next week. I'll include a homemade treat, some jars of preserves and maybe a few other little things, but I don't want it to be too complicated because then it won't be fun.

Sometimes I am overwhelmed by the focus on buying and giving that comes this time of year, but I truly enjoy making, finding, and giving gifts. I'm trying to do things that I really want to do and that are manageable and I'm letting go of the rest so that I don't feel too busy and rushed. The enjoyment should be part of the gift.

Last year I listed some ideas for a handmade holiday. Food in Jars has a roundup of homemade gift ideas. The Kitchn has another list of homemade gifts. If you have had enough of making (or aren't into making it yourself) there are so many amazing handmade gifts you can find. I also love giving experiences -- one year I gave my little sister a dress pattern with the promise of going to pick out fabric and make the dress together.

I hope everyone can find the sweet spot between doing everything and enjoying everything that needs to be done. I'll be sharing more of my holiday preparations and projects in the next couple weeks. I'd love to hear about yours, too!

December 4, 2011

Recently (some things I've been enjoying)

DSC_0092


I've been listening to the Goat Rodeo sessions a lot. You can hear this beautiful music here. 

I just read Unbroken, a compelling and fascinating book which I highly recommend.

I made this apple cake, in attempt to make a dent in all the fruit we have. It only used two apples, but it is a really good any time of day or week cake.

Speaking of fruit, we got our first clementines of the season in our fruit share last week. The sweet citrus was a taste I didn't know I had missed. So good!

I would like to hang this print and this one in my kitchen.

I'm finally making progress knitting the hat I started two years ago. I'm glad to get back into knitting, it so relaxing and yet productive. Next, I need a new scarf, then I hope to be onto a sweater...

I saw Breakfast at Tiffany's for the first time last week (it's available to watch instantly on netflix). I can't believe I'd never seen it before. My favorite scenes were when they were in the library surrounded by the drawers of card catalogs and when they were talking to the man at Tiffany's about Cracker Jack prizes.

I started a Pinterest account which seems to be the perfect answer for where to stash good ideas that I find online. I haven't had a chance to explore it deeply, but it is fun to see so many ideas in one place.

New bags will be in the shop today!

February 3, 2011

Love to Sew: A Valentine Envelope Tutorial


I've been torn about whether to post this tutorial this week or to wait until we get closer to February 14. I hate to rush holidays but we've made it to February and I've had valentine aprons in my shop for a few weeks. I know that more often than not, holiday making can require some preparation and planning ahead. This project is quick and can be done at the last minute or as soon as you would like. These fabric envelopes have many uses, but Valentine's Day is the time for decorated cards and love notes to everyone you care about. It's good to have a project to keep you warm and cozy during this month which can be so cold and dreary.

When I was a kid, we always made a Valentine's Mailbox which we decorated with lots of pink and red and doilies. We filled with cards that we made for each other. I'm not sure if this envelope would make it through the USPS (it would be fun to try) but it is ideal for the Valentine's mailbox or hand delivery.

These envelopes are very simple and quick. There are a couple of variations which I will mention in the directions. My instructions are for machine sewing, but you could easily sew this by hand as well. As always please leave your questions in the comments or contact me directly! I definitely want you to have success with making this.

Materials:
Scissors
Fabric
Thread
Optional: a button and elastic to make a loop
                a snap or velcro

valentinetutorial1


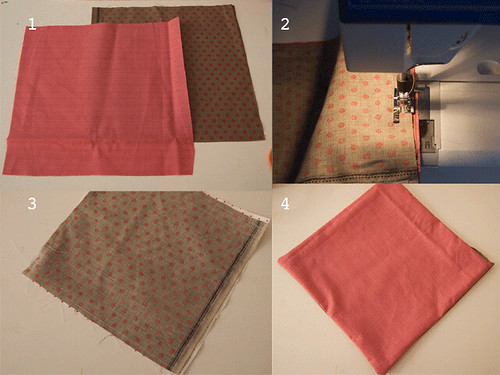
1. Cut out two squares of fabric. For the first envelope I used 10 inch by 10 inch pieces and then made and envelops that was 7 by 7. The smaller you make it, the trickier it will be to sew it together with a machine, but if you want a really small one you can always do it by hand.

2. With the right sides (the printed sides that will eventually face out to make the front and the inside of the envelope) facing each other, sew around the edge of the fabric. Leave about two inches open and unstitched between where you start and finish sewing.

3. When you are done stitching it will look like this.

4. Gently reach into the opening and turn the fabric so the outside goes in. The printed side of the fabric will now be on the outside and there will be a small opening.

valentinetutorial2


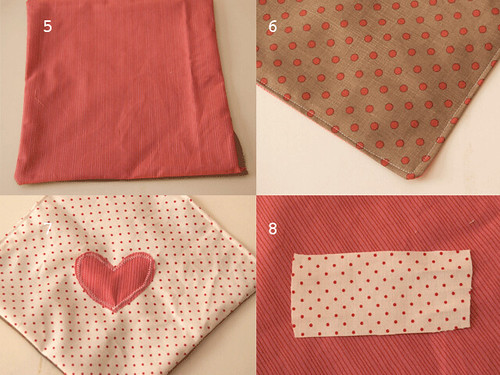
5. Prepare to sew up the hole. Make sure that all of the corners are completely pushed out so there is no fabric bunched inside.

6. Fold in the raw edge of each side of the opening and stitch along the edge to sew up the whole. You can sew all the way along the side that had the opening as well as one adjoining side. This will make the top flap of the envelope.

7. If you want to add any stitched designs or applique to the front of the envelope this is a good time to do it. (you can also add this before you start sewing the two pieces together, after step 1)

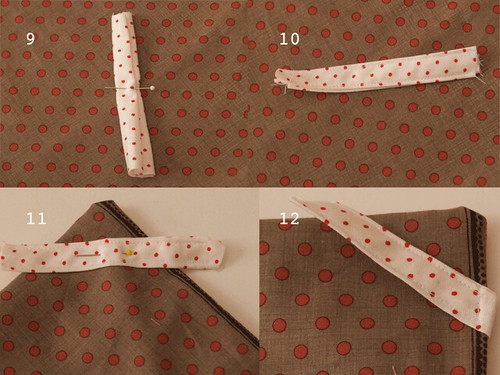
8. There are a few options to make the envelope stay closed. You can use a button and a loop of elastic (see 19), a snap, velcro, ribbon, or you can make a little close loop following steps 8-12 (the finished loop is shown in 18). To make this close loop, cut a piece of fabric about 4 inches by 2 inches.

valentinetutorial3


9. Fold the long raw edges of the small piece of fabric into the middle and then fold the folded edges to the middle so the long cut edges are completely hidden. You can iron this flat if you wish.

10. Sew along the long open edge of the folded fabric. Then stitch along the other long edge.

11. Take the corner of your large square that has no exterior stitching on either side. Make sure the fabric you want on the outside of the envelope is facing up. Pin the small loop piece so it goes straight across the corner of the square about a half inch down from the corner point.

12. The loop piece should stick out farther than both sides of the square's corner (see 11). Fold the extra from the loop strip under the corner fabric and stitch in place. Repeat for the other end of the loop.

valentinetutorial4


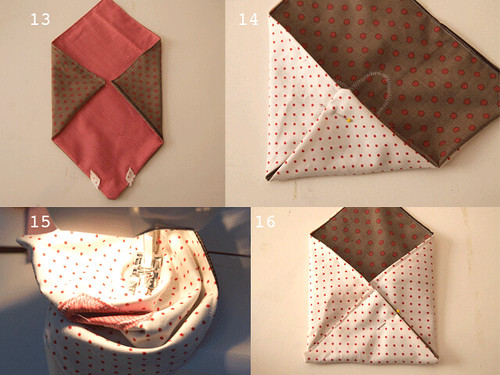
13. Place the square of fabric so the corner with the loop is at the bottom and the corner that has been stitched is at the top. Fold the left and right corners in to meet each other. Fold up the bottom corner and adjust as needed to make a rectangular envelope. The top corner should come down slightly past the bottom corner.

14. Once you have figured out the best way to fold up your square, pin the left corner under the bottom corner so that the two sides meet with a slight over lap.

15. Stitch along the open edge of the pinned sides all the way to the newly formed corner of the envelope. This can be a little bit tricky with a machine, just take care to make sure that you don't catch any other fabric in your stitches. You don't have to stitch all the way to the end, but just until you have nearly reached the corner. It is easy to stitch this by hand if you want to.

16. Pin the right side as you did the left and sew that in place.

valentinetutorial5


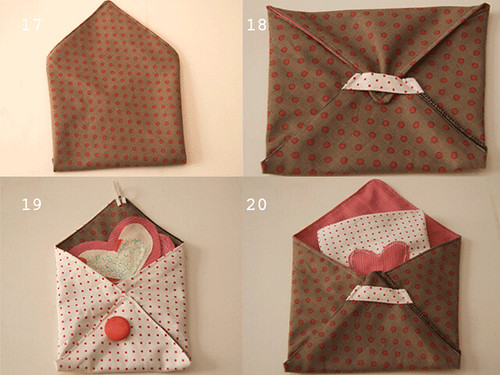
17. Your envelope is now ready! This is what it will look like from the front.

18. If you made a close loop your envelope is finished.

19. If you prefer not to make the little close loop (shown in 18) you can sew a button to the bottom flap of the envelope and make a loop at the top corner to keep it closed. You can also use a snap, velcro, or any other method you would like.

20. Fill your envelope and send it off (I'm not sure if you can actually send it in the mail, although if it is stitched shut with address and stamp stitched on you might be able to, I'd like to try it soon!).

Happy Making!

January 25, 2011

The Dinner Game

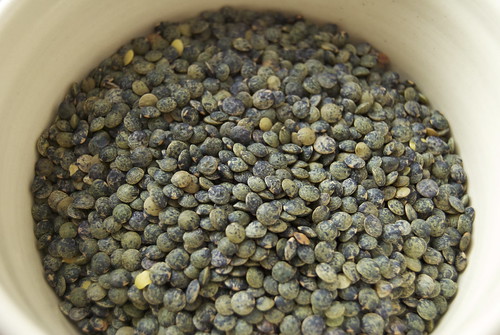
green lentils


I have a very practical little game that I like to play -- perhaps you've played it before? I'll call it the dinner game. I play it when I am at work sometimes or busy with something else and wondering what I will make for dinner. It does not involve a cookbook (though it could, I suppose), nor does it involve a trip to the store. Instead, I mentally take stock of what I have in my kitchen and puzzle out how to put it all together into a meal. Often I'll start with one simple idea and then realize other possibilities or ingredients I can incorporate to make something even better.

I am starting to imagine this as an actual game that the food obsessed could play while relaxing after cooking and eating. It has been played on cooking competition shows like Top Chef when the contestants are limited to making something with ingredients only from a vending machine, or only ingredients that carnivorous dinosaurs would eat. But in my kitchen the ingredients aren't usually too obscure, so I guess I shouldn't feel quite so self satisfied. Still, it's fun to go from lentils, potatoes, carrots, goat cheese, tomatoes to here's dinner.

I came up with this gardener's pie with just such a process. If you're wondering, gardener's pie is the all veggie version of shepherd's pie: a hearty stew blanketed in flavorful mashed potatoes. Perfect for the cold winter weather that seems to be all around. I didn't invent the dish, my mom makes a different version of gardener's pie, but it was fun to realize that all the ingredients I had would come together into this warm and well filled pot.

gardeners-pie


It isn't the most photogenic dish, but I've included a glimpse of the final product. It is mostly a one pot meal, except that the potatoes get cooked separately and then mashed. I also added some roasted garlic, but you can make it more simply, if you want. My recipe is a good guideline for the gardener's pie and you can vary it, using whatever vegetables you have in your refrigerator or pantry.


Gardener's Pie
As I mentioned above, you can substitute any of your favorite vegetables or whatever you have available for the ones that I used. You could add some sweet potatoes to the potato topping and substitute already cooked beans for the lentils. Although I think this recipe is great as it is, this dish is great for using what you already have in your kitchen. 

olive oil
1 cup yellow onion, diced
1 large carrot, diced
4 cups canned diced tomatoes
1 cup french green lentils
1/4 teaspoon salt
3 tablespoons chopped fresh parsely
I cup broccoli, chopped
I cup cauliflower, chopped
salt and pepper to taste

For the potatoes:
1 1/2 pounds potatoes, cut into smaller pieces for boiling
4 cloves garlic
1/4 cup milk
salt and pepper to taste
3-4 tablespoons chevre (or as much or as little as you want to add to the potatoes)

1 teaspoon chopped fresh rosemary

In a 3 1/2 quart dutch oven, heat about a tablespoon of olive oil. Add the diced onion and cook for a few minutes over medium heat. Add the carrot and parsley and cook, stirring occasionally, until the onion is just beginning to brown. Add the tomatoes, lentils and salt. Let it all simmer for 30 minutes or until the lentils are tender, adding more water if necessary to cook the lentils. When the lentils are cooked, stir in the broccoli and cauliflower. Add salt and pepper if needed.

While the lentils are cooking, preheat the oven to 350'. On a baking sheet or small baking dish, place the garlic cloves in their skins. Bake until the garlic is soft (about 20 minutes). Meanwhile, place the potatoes in a pot and cover with water. Bring to a boil and cook until the potatoes can be easily pierced with a fork. Drain the potatoes. Squeeze the soft garlic out of its skin and mash it into the potatoes. Add the milk, a little at at time (using more if necessary) and mix and mash the milk and potatoes together until the potatoes are soft and creamy. They do not have to be entirely smooth. Add salt and pepper to taste

Once the lentils are cooked and all the vegetables have been mixed in, add the chevre to the potatoes, a small spoonful at a time. Do not incorporate it entirely, it is nice to find little pockets of the cheese in the potatoes. Spread the potatoes evenly on top of the veggie and lentil mix and sprinkle the rosemary on top. Bake in the oven for 15 minutes. Let cool slightly before serving to avoid burning your mouth.


Serves 4-6

January 6, 2011

Returning to a New Year.

Albany Amtrak at Night

Have you ever had one of those dreams where you have to be somewhere important and you are continually side tracked, distracted, and delayed from reaching the place you need to get to?  During our two weeks of traveling and visiting as many friends and family members as we could fit in each day, I occasionally thought of these dreams. While sleeping, these visions are confusing, disorienting and frustrating but when I am awake, I realize that not taking the exact route or schedule that you thought you would is just part of life.

On the day we had originally planned to reach Ray's parent's house in New Jersey, we found ourselves in Portland enjoying a delicious dinner with dear friends. When we thought we were flying back to Minnesota, we instead boarded a train to Chicago, then another train, and got home more than a day later (although train travel is slow, it is roomier and more relaxed than any other long distance motorized transport I have experienced). I'm not always the greatest at going with it when plans change, but sometimes better things come than what I had expected.

The travel and vacation gave me lots of time to read and also to think about goals and plans for 2011. Clearly making plans and setting goals doesn't mean I will end up exactly where I think I will, but I do like the end of one year and the beginning of another as a chance to reflect and find a fresh start going forward. Of course I have at least 20 things I want to do better or do more of, but I've written down a few goals that I hope to really focus on. In the next few days I'll be getting organized, started on new things, and back to my sewing machine. I'll see you next week!
*This photo was taken by Ray at a stopover in Albany, NY. Thanks for letting me post it here, dear!

December 14, 2010

Share the Warmth of Hot Cocoa

Hot Cocoa

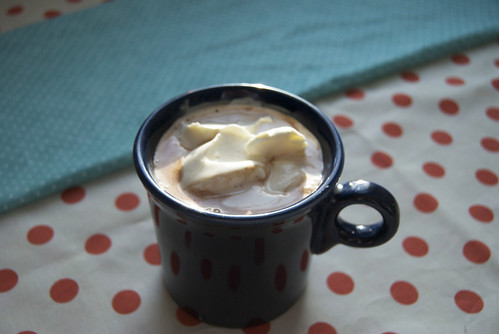
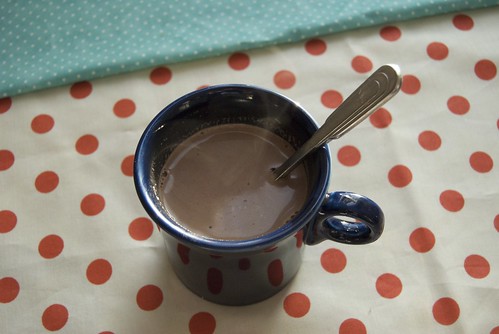
Sometimes a cup of hot cocoa is just the thing. A treat alongside a cookie, a cup shared with a friend, something to wrap cold hands around and be warmed inside and out. It has been so cold here and very snowy and I've been indulging in hot chocolate often.

As a child, during winter vacations I would spend hours ice skating on a nearby pond and drinking Swiss Miss by the thermos-ful. Now I like something just a little more grown up: more chocolatey, less sweet, with enough cinnamon to add flavor and a hint of cayenne for extra warmth and spice.

Hot Cocoa Mix

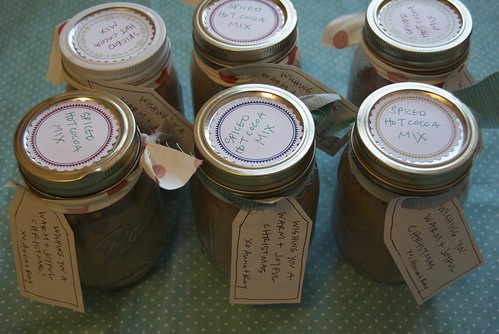
I made several batches of my hot cocoa mix to fill pint sized mason jars. I think they'll make great gifts for a holiday season that is all about warmth, light and joy in the middle of a cold dark time of year. If I can't sit down to a cup of hot chocolate with a friend, I can at least send my warm wishes and the ingredients to make one. Although I am keeping things simple this year, I think a unique, handmade mug with a jar of homemade hot cocoa mix would make a wonderful gift.

DSC_0087

Hot Cocoa 
I'm including the recipe that I use for just one cup, as well as the recipe for a whole jar. I have only tried this recipe with cow's milk, but I am sure that it would be just as good with whatever kind of milk you prefer. I used Equal Exchange Organic and Fair Trade Cocoa Powder which has great flavor and comes from farmer cooperatives. You can use whatever kind you like. If you want pure chocolate with nothing else in the way, omit the spices.

One Cup Mix:

4 teaspoons (7 grams) cocoa powder
1 1/2 teaspoons (9 grams) granulated cane sugar
A sprinkle of cinnamon
A small pinch of cayenne powder

Mix all the ingredients together and place in a mug. Add 8 ounces (One cup) of hot milk. Stir to blend. Serve with whipped cream or homemade marshmallows. Enjoy!

Pint Jar Mix:
1 1/4 cups (90 grams) cocoa powder
1/2 cup (108 grams) granulated cane sugar
1/2 teaspoon of cinnamon
A sprinkle of cayenne powder

Place all ingredients in a pint jar. They won't fill the jar all the way to the top. Cover and shake to combine the ingredients. To serve, add one heaping tablespoon of the mix to 8 ounces of hot milk. Serve with whipped cream or homemade marshmallows.

December 6, 2010

Festive Holiday Garland Tutorial

holidaygarland1

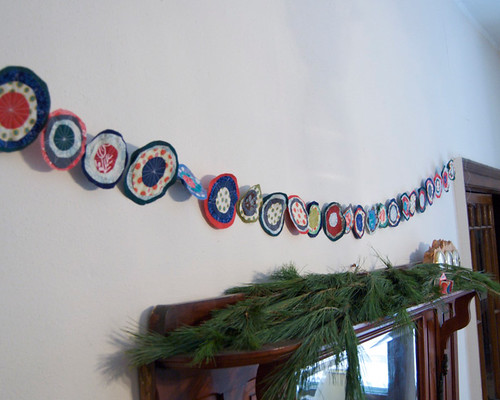
I made this festive garland and I wanted to share. I started making these multicolored circles as ornaments that would hang alone. When I saw them all together I wanted to keep them this way. The great thing about this project is that I used scrap fabric to make it. I love mixing bright colors and patterns, but you could also use varying shades and patterns of one color. Or you could combine a couple of colors like red and green, gold and white or blue and silver.

You could put this garland on a tree or hang it anywhere that needs a bit of festivity.

Materials:
Fabric, in various colors or patterns
Scissors
A sewing machine
A sewing needle
Heavy duty thread for stringing the garland, upholstery or quilting thread works well


 holidaygarlandtutorial1

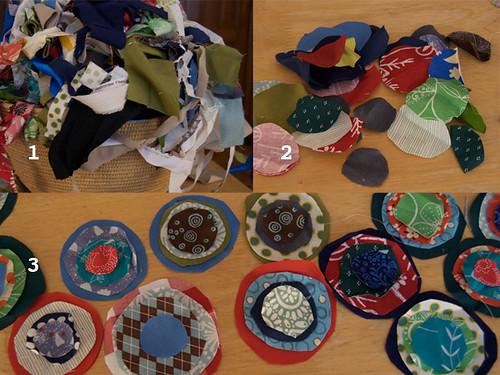
1. I save all of my scraps from making other things and I have plans for a few projects in mind to use them. For this project, I chose pieces that were big enough to cut large circles (about 4 inches in diameter) and three smaller sizes.

2. Cut the circles in a variety of sizes. There is no need to measure, but just make sure that there are approximately four different sizes.

3. Match up the circles. I chose to give each one four layers, starting with the largest and making sure that each circle is about a quarter of an inch smaller than the one on top so you can see each layer of fabric.

garlandtutorialsewing

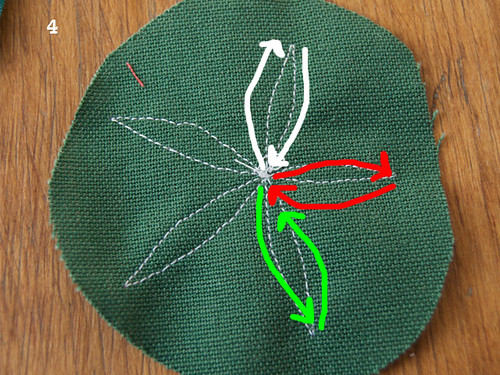
4. Sew the circles together. The back of this one shows the sewing pattern, but, to keep all the circles lined up, I sewed them from the front. You can use whatever method of attaching the circles together that you want. A simple stitch in the middle will hold them together. However, I liked sewing them together in a star pattern. It binds the layers together smoothly and adds another element of design to each piece.

To sew in this pattern, start in the middle of the smallest circle. Sew out toward the edge of the second largest circle. From there, turn and sew back toward the middle. Repeat this as few as three times or as many as five to make this star shape and completely bind the circles together.

holidaygarlandtutorial3

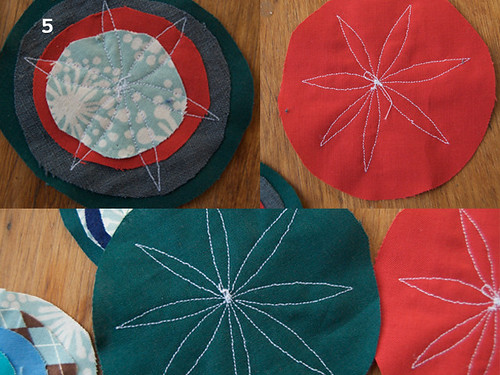
5. A few examples of the way that I sewed the circles together. On the larger circles I often made more than five points. It is not necessary, just a bit of design. Finish sewing all of your circles together before putting them together as a garland.

garlandtutorial4

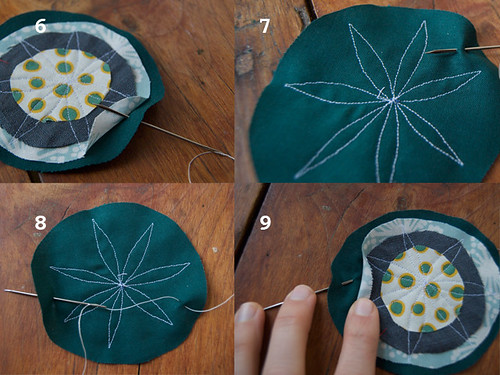
6. Now its time to put all of the circle pieces into a garland. Using your needle and thread, start on the edge of the first circle. You can hide the stitching, by poking the needle into the biggest circle's fabric under the second largest circle. Choose a spot on the upper half of the circle (once the circles are stitched onto the thread, they will be able to move, to keep them from falling forward, you want to stitch through the upper half of the circle). Holding the circle so the side with all the layers is facing you, poke the needle through the back to the front.

7.Then, poke the needle toward the back. Pull the thread through the two holes.

8. Find a spot across the circle from the other needle holes and sew to the other side (in the photo the upper half of my circle is on the bottom, until I flip it over in step nine).

9. The needle is poking through to the front of the circle. Poke it through to the back of the circle again.

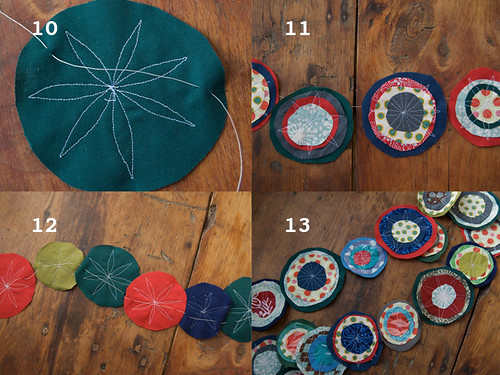
garlandtutorial

10. Here, you can see the way the stitching will look from the back.

11. Continue stitching circles onto the thread, sliding them down the thread as needed, until all of the circles are attached to the thread.

12. They look pretty, like Christmas lights or balls from the back.

13. Once all of the circles are stitched onto the thread, you are ready to hang your garland. Make sure to leave plenty of thread on both ends to hand it from. The circles can slide closer or farther from each other as needed.

holidaygarland

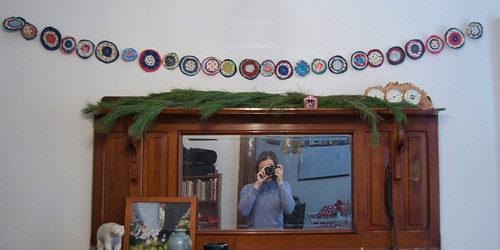
I hung my garland over the mantle in our living room, with some pine boughs, it's looking quite festive.