Showing posts with label sewing. Show all posts
February 16, 2017
A Practice of Warmth and Joy
I have always valued time to do nothing while I let my gaze and mind wander. I can think of many childhood moments watching rain drops slither across the car window or waking up and staring at a crack in the ceiling or the colored squares on a rug. Maybe you watch the clouds as they slowly morph from one shape to another or follow the patterns of the tiles on the bathroom floor. Our eyes and minds are always trying to find recognizable shapes and patterns, to make some sense of things. It's the patterns that aren’t quite symmetrical, that don’t repeat exactly the same way that really draw me in. Instead of letting my eyes and mind complete the sequence and move on, they keep me searching for connections and trying to understand. I recently checked out a book of quilts from the library full of many scrap quilts that begin with a pattern but veer off as colors and fabric run out. Or they go wild from the start when the quilter makes use of whatever fabric she has on hand or whims she chooses.
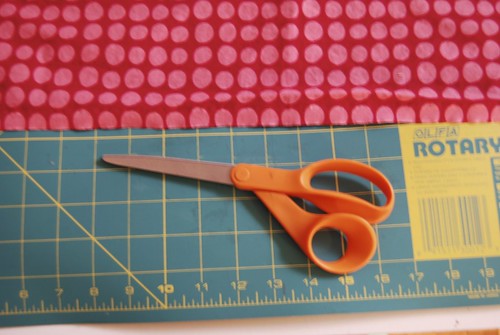
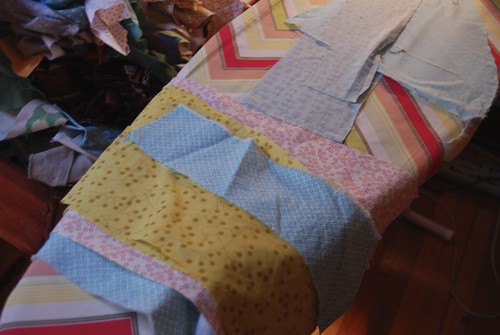
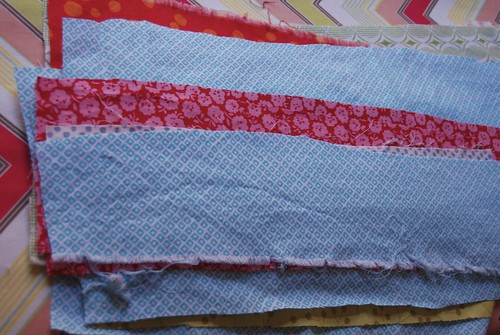
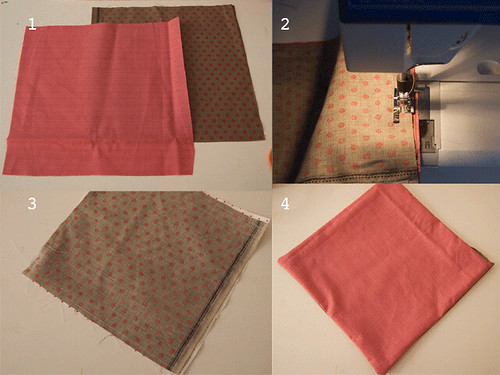
Seeing these joyous acts of sewing, of piecing together scraps and ideas, has reassured me that perfection does not have to be the aim of quilt making. When I make quilts, corners don’t always line up and the edges are not usually even. But the process of choosing colors and patterns from the stash of fabric on my shelf is an experience of joy. Quilting is one way to turn scraps into something beautiful and useful, an intersection of creativity and necessity. Saving scraps and repurposing fabric to make quilts was practiced most often by women in the twentieth century as an inexpensive way to keep their families warm. Often they didn’t have the time or fabric supply to be picky about patterns and colors. Instead they used scraps of fabric, pieces of old clothes and cuts of worn out denim to create quilts that were essential to their homes and their creative spirits.
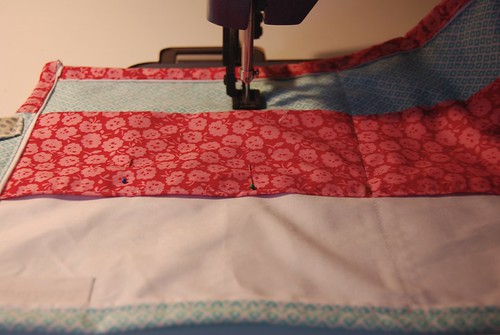
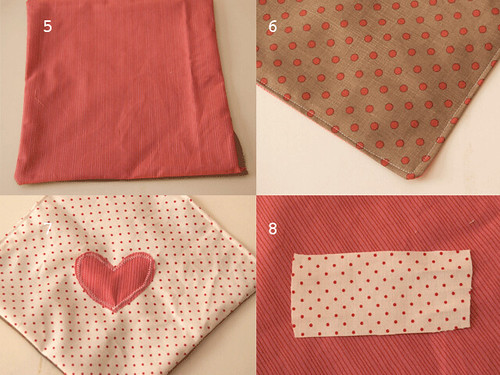
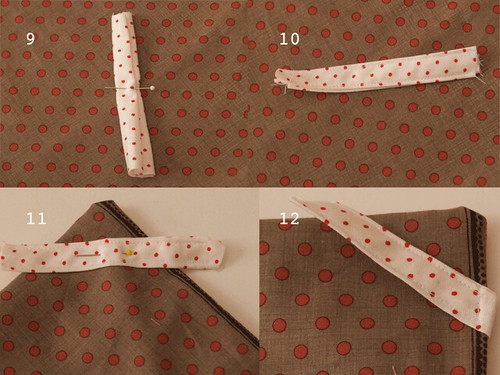
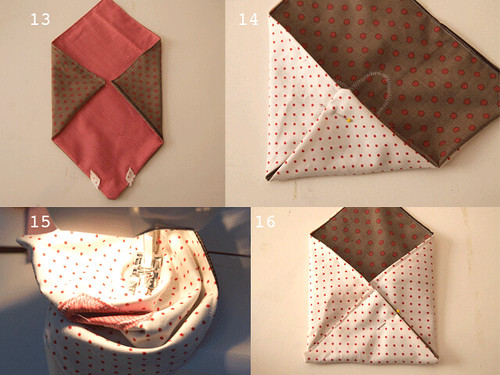
Beyond using scraps for the top, thrifty quilters have used old clothes, tattered quilts and other materials instead of batting when it wasn’t available or affordable. But the need to cover big beds and keep little toes warm was also a chance to take a colorful break from work and chores and spend time creating. It reminds me of the saying that firewood warms you twice, but instead of the way splitting and stacking the wood warms you long before you burn it, the process of making a quilt is a practice of warmth and joy. When I am done playing with colors and patterns, I love the act of quilting as a way of binding things together. On a winter evening, I spread the quilt on my lap and use stitch after stitch to make three layers into one. All the cutting, piecing and stitching are as joyful as tucking under the quilt or giving it away.
Perhaps it is the uncertainty and chaos of world events, perhaps it is the uncertainty and chaos of parenting, but I am so drawn to creating order and chaos with colors and patterns and to stitching it all together by machine and hand. This quilt (with nine month old Eowyn for scale) is for our friends' baby due in the spring. I started by making flying geese triangles and then decided to make squares instead. I have more fabric and ideas waiting and I keep picturing a stack of little quilts, neatly folded and resting in our living room. That would last about a second before Amos would spread them all around and turned into imaginary boats, buses, or trash trucks. We all have our own ways of finding that joy in creating.
January 31, 2017
Letters and Numbers
Amos and I have been reading a lot of Winnie-the-Pooh in the past few days. It is the closest we’ve come to reading a chapter book and it is nice to cuddle up together to read about the friends in the hundred acre wood. Amos has been more interested in numbers and letters lately as he continues the process of learning about the world around him. We count body parts and slices of cheese and he is quick to tell us that he will be ready to go in six or thirteen minutes. I recently saw a list of beautiful alphabet posters for kids and it occurred to me that this would be a fun way for him to explore letters. Then I realized that I could make something that would do the trick.
I’ve become more interested in letters lately, too. It started with the banner I made for the women’s march (or, rally as it was at the Maine state capital). Sewing fabric letters is time consuming and not as practical or interesting as calligraphy or type face, but it is most often the medium I choose for whatever I have to say. I am drawn to words, especially words of wisdom from others. When I was in high school I had a little notebook where I would jot down quotes that I liked. Words remind me of what I want to believe, know, or understand and I make things to deepen this understanding and to interact with the world in a meaningful way. Sewing words doesn’t come close to bringing them alive, but it is a way of bringing them to my attention, of giving them greater importance. I turn fabric into words and then, slowly work at turning this words again into actions
July 1, 2016
Exploring
Summer has finally arrived in Maine, filling the sky with blue, warming the air to the perfect temperature, and leaving everything else astoundingly green. It is such a short season here, sometimes I start to panic (it's already July!!) and worry that we won't get to do all of the things that seem essential to a wonderful summer. Luckily, we've already made it to the beach a few times, picked piles of strawberries, and taken a spontaneous trip on the mail boat run around the sparkling water and islands of Casco Bay. That leaves plenty of days for walking and biking to a playground, eating popsicles, working in our community garden plot and feeling the perfect breezes through open windows.
Here on the Maine coast, not all summer days are sunny and warm. Foggy days give us a break from slathering on sunscreen and a chance to be enveloped in a completely different palette of colors. We welcome the sun when it returns.
I try to get Amos, Eowyn, and myself out on a small adventure most mornings. Adventure is probably too strong a word for simply getting out of the house and going somewhere. Although we aren't really out in the wild, we can easily reach many beautiful trails, parks, and beaches. We find pockets, patches, and swaths of nature all around.
Amos is happy exploring anywhere outside. We watch birds and ants, throw rocks, dig in the sand or soil. He often hands me the flowers, rocks or pine cones he collects and I quickly lose them. My solution was to sew a collecting pouch that he can bring on adventures to carry the treasures he might find. I used a bit of muslin from my dyeing experiments and appliqued it with some wool felt that I got on a visit to Purl Soho. I'm sure it will see many more adventures before the summer is over. Where are you exploring these days?
March 25, 2016
Cloth Covered Rope Basket
Where did it come from? Who made it? Amos asks these questions all the time. My answers range from: I don't know to A farm or A cow or, often, probably a factory. Sometimes the answer seems simple, I made it. As I've gradually sewn things for our home, I can look around and see many things I've stitched together for the place that I spend most of my time. It is gratifying to make things I love for the place and people that I love, but sometimes it seems like so much patchwork!
As someone who rarely measures and often cuts more than once, I have a huge basket of small scraps of fabric. Many of these are from trimming off an edge or a little extra fabric, others have found their way there when they are not big enough to iron and fold neatly on the shelf. Cloth covered rope baskets are currently my favorite way to turn many of these scraps into something that is as useful as it is lovely to look at. I have often wanted to be able to make more baskets and containers for storage and was delighted to discover a kind of basket that I could sew instead of learning the more complicated skill of basket weaving. Making fabric covered rope baskets is a slower process with a few extra steps than just coiling and sewing the rope alone but it is a fun way to choose color combinations and use up scraps.
I have a lot to learn about shaping the baskets and I still can't be sure they will turn out exactly as I envision. This one was headed away from what I had hoped, but adding the little handles made all the difference and I am quite happy with the final result. This basket will be just the spot for keeping a few toys for the baby separate from all the other toys in baskets, drawers and strewn about.
February 18, 2016
There will be love and warmth
I made this quilt for our friends' baby. I thought it would be finished and arrive on their doorstep weeks before he was due, but he couldn't wait to see the world and arrived much earlier than expected. Now I hope he will be home before the quilt gets there.
My design for this quilt was inspired by the fanfare baby blanket that I somehow discovered via Made By Rae. It is a simple design, but a chance to choose fun fabrics and colors. Unlike a quilt for a larger bed, a baby quilt doesn't have to have a timeless pattern or last forever. The design can be simple or more detailed because is it is a very manageable size. I was worried that I wouldn't be able to get point of each triangle perfectly shaped and I didn't, but I am still happy with the way the quilt turned out. I especially love the lines of hand quilting in between the sections of triangles.
It means a lot to me to give things that have been handmade with care, even if every corner is not completely perfect. Baby quilts will be dragged around, washed repeatedly, and, hopefully, loved until they are worn and threadbare. I can't help but think of the way this is connected to parenting: you do your best, it won't be perfect, but there will be abundant love and warmth.
The quilt I made for Amos before he was born was used as a play mat for several months. He's slept under it most nights for the past year or more. I have mended the frayed seams and I look forward to making him another quilt when he needs one to cover a bigger bed. Now, I am searching for inspiration or a pattern that I am excited about because I need to make another quilt very soon for our baby who will be here in a couple of months.
May 8, 2015
Not Essential
I've been trying to stay focused this week, to work on some writing projects and other must-dos but spring has been very distracting. Amos and I have been spending most of the day outside, at the beach, the playground, on walks and bike rides. When I am inside I have been diving into some fun but not totally essential sewing projects.
I have come to really love making things that I can wear. It's the same satisfaction of cooking from scratch, when you make something in your own home with your own hands that you thought had to be bought from the store. The nice thing about sewing is that the results last longer than one meal. Inspired by Me Made May, I have been wearing something handmade almost every day. I found this fabric a few weeks ago and knew that I had to make myself a skirt. I wanted to get out of my A-line skirt rut so I was excited to find this gathered skirt pattern. The pocket panels completely stumped me for a while but once I figured it out it was not a difficult project.
It has been a long time since I made something for Amos. Now that we have had some warm weather I thought he might like to wear shorts. I made a pair that is reversible (orange on the other side) and I plan to make a few more pairs as soon as I can.
I am grateful that I can find the time and ambition to make these things and although they are not essential I love being able to make things that are beautiful, useful, and fun.
I have come to really love making things that I can wear. It's the same satisfaction of cooking from scratch, when you make something in your own home with your own hands that you thought had to be bought from the store. The nice thing about sewing is that the results last longer than one meal. Inspired by Me Made May, I have been wearing something handmade almost every day. I found this fabric a few weeks ago and knew that I had to make myself a skirt. I wanted to get out of my A-line skirt rut so I was excited to find this gathered skirt pattern. The pocket panels completely stumped me for a while but once I figured it out it was not a difficult project.
I am grateful that I can find the time and ambition to make these things and although they are not essential I love being able to make things that are beautiful, useful, and fun.
March 6, 2015
Something that Won't Compute (or Make Something!)
The way that I spend much of my time is an ode to the joy of making. I hope this blog reflects that and I hope to send out sparks of inspiration whenever I can. If I'm not specifically focusing on why I like making things, then I am telling you about my most recent creation. Every so often I get an extra jolt of excitement from a projects and recently that has been from sewing clothes. I finally finished the second Esme top that I mentioned last week and I got to experience, again, the thrill of making something that is not only useful but also makes me feel great when I wear it.
In one of my favorite poems, Wendell Berry writes, "So, friends, every day do something that won't compute." Something that is more satisfying and fulfilling than making a purchase with the click of a button and waiting for it to show up on the front porch. Something that might not turn out perfectly, might be hard, and will take time. I've had way more disasters than successes whether I am cooking, sewing, or trying to build something but I still believe that using your hands and your mind to create is a way to bring your ideas and dreams into reality. It might taste, look, or feel better than anything you've done before. It might make you laugh and start over again.
I don't know how to express it perfectly, eloquently but the other night finishing the last seams and putting it on I wanted to shout to everyone who needs to hear, Make Something!
November 10, 2014
Tiny Project #3
We walked into the kitchen and I dropped the grocery bag on the chair. Amos wasted no time in exploring the contents of the canvas bag. He pulled out a plastic bag full of unpopped kernels of corn and lost interest in anything else that we had brought home. He dropped the bag on the floor, delighted by the sharp sound as it hit the tiles. Sliding his feet back and forth as he stepped on the bag, he explored the texture of hard kernels under his feet. He picked it up, carried it around, dropping it, squeezing it.
It was a relief to me that this bag of popcorn could keep him occupied for so long. It crossed my mind that the bag would probably, eventually break but after a whiney, difficult, tired morning I didn't care as long as he played happily while I did some of the things I needed to do. While we both continued our activity, I waited for the inevitable scattering of seeds across the floor. With this barely a worry in the back of my mind, I thought of bean bags. If Amos could enjoy a plastic bag of kernels so much, maybe he would like something he could play with all the time. Instead of waiting until sometime later to make the bean bags, why not now?
I grabbed a jar of old popcorn which no longer popped into the fluffy, crunchy treat I can always eat by the handful. The old kernels could go to better use as bean, er corn, bags. It took no more than 10 minutes to stitch the squares together, to carefully fill them with popcorn, and to bind the open edge shut. I tossed each one on the floor behind me and they landed with a satisfying smack. Amos might be more drawn to something out of the grocery bag or cupboard, but this homemade toy has so much more potential. Bean bags are great for throwing when wooden blocks and other hard things are not. They fit into cups and bowls instead of water which is best left in the bathtub. They have a wonderful weight for tossing and catching over and over again. They are the easiest thing to sew and they don't have to be square or even as long as as they are stitched tightly so none of the kernels or beans can escape.
If you don't have a small child, an interest in juggling, or an urge to play lawn games, you can also make a very nice eye pillow by cutting a rectangle instead of a square. If you use rice or flax seeds then you can warm the pillow in the microwave for relaxing treat. Perhaps while your child amuses himself with beanbags?
Materials:
Cotton fabric
Popcorn kernels, small dry beans, or uncooked rice to fill the bags
Cut two squares of cotton fabric. 4 inches by 4 inches (or a bit larger) is a good bean bag size. For an eye pillow you could cut two 9 by 4 inch rectangles.
Line up the squares with the right sides (printed sides) together. Stitch around 3 sides of the square, about a half inch in from the edge of the fabric (this is the seam allowance). Turn out the square so that the right sides of the fabric are facing out. Pour in enough corn kernels, beans or whatever you are using to fill it about half way.
This part can be a bit tricky. Taking care to keep all of the beans inside, fold the raw open edges down about a half inch toward the inside of the bean bag. Pin or hold the folded sides together and stitch them shut.
Toss the bean bag toward any interested person. Make another if you want.
P.S. Tiny projects #1 + #2
September 29, 2014
Cutting and Sewing
For me, quilts are usually free-hand affairs. I could probably save time and the occasional blister from not-sharp-enough scissors by using a rotary cutter but that's not my style. I made this quilt over the past couple of weeks as a gift for a soon to be new baby in the family. I love playing with color and patterns and as I worked on it I realized how much making this quilt captured the spirit of most of my creative endeavors.
It starts with inspiration and excitement about a new idea. The early stages take planning and cutting fabric and, in this case, figuring out how many squares and triangles to cut. After planning, the work begins. Sewing the same seams over and over isn't as exciting as scheming about the design, but it is a necessary part of the process. After some of this practical work, I have to figure out whether my idea will actually come together and determine if I need to do more sewing and cutting.
In nearly every project there is a moment, or moments, of doubt. I see my original vision disappear and worry that my free-hand approach will lead to disaster. There are times when it does but more often I keep working and the project turns a corner. The results of my work become something better, though different, than what I imagined. When I can see my work turning into something I love, I again feel the excitement about the project. Then there are the finishing touches like quilting, binding, snipping threads which can take just as long as the rest of the work.
I often wish that I was more inclined to follow a pattern that would always yield precise, predictable results. But I can't keep myself from jumping in and forgoing step by step instructions for my own ideas, challenges and whims.
How do you find joy in creating?
May 30, 2014
Tiny Project #2: Make it Your Own
With the arrival of summer weather I decided that Amos and I both needed some t-shirts that we could wear every day. I am not about to sew a t-shirt myself, but I was excited about the idea of adding my own designs to some soft, durable shirts. There are many, many ways to do this, but applique is my method of choice.
This little project is a great way to refresh shirts that you might not love any more, or to embellish new-to-you t-shirts. So far, I have made three for Amos and one for myself. If you are nervous about ruining a shirt that you love, try appliqueing on a shirt you don't really like, on a test piece of fabric, or on a shirt for a little one who will soon have it covered in blueberry or watermelon juice (so it doesn't matter if it isn't perfect).
I used quilting cotton and jersey cotton and was happy with both results. The appliqued design will first be attached to the shirt with fuseable interfacing which helps keep the stitching strong and gives you a little freedom to play with the stitch that you use. If you are using quilting cotton a zig-zag stitch around the edges will keep them from fraying. You can zig-zag or straight stitch depending on which you prefer and if you don't mind a slightly frayed edge. You can also sew into the middle of the applique fabric to add texture and pattern (as in the feather, above) Simpler shapes and fewer fabrics will work better if you are a beginner, but try whatever you like.
Materials:
A t-shirt or other fabric
fusible interfacing (available at fabric stores)
cotton fabric for the applique design
thread, pins, an iron and a sewing machine
Begin by choosing a design or image you want to create in fabric. You can draw it first or just start cutting the fabric.
Once you have your design, cut it out of fabric and out of the interfacing. I cut my fabric image then lightly ironed it to the interfacing and cut the interfacing to match the fabric.
Choose where you will place the applique on the shirt. The interfacing should in between the shirt and the cotton fabric. Iron all three layers to fuse them together. They will be fused together lightly so you may want to pin the applique in place before you sew it just to make sure it doesn't shift at all.
For stitching the design you have many options. You can choose a zig-zag stitch on your machine and go all the way around the edges of the applique fabric. You can go around the edges with a straight stitch (quilting cotton fabric will fray on the outside of the stitching). You can use a straight stitch to create pattern and texture within the fabric and help secure the fabric more sturdily to the shirt.
Since t-shirt fabric can be stretchy and slippery, it is easiest to keep your stitching on top of the applique design. You can add stitches on the t-shirt itself, as I did with the chicken's legs, if you want.
I am excited to share these tiny projects with you. If you have any questions or my directions are unclear, please ask!
April 18, 2014
Begin It
Last week brought a hint of spring and along with the all the fresh air, open windows and warm sun, it also brought me inspiration to get going on some new projects. I made a pair of pants for Amos from Anna Maria Horner's book Handmade Beginnings. Most of my clothes making experience has been sewing skirts for myself and I rarely follow a pattern. I'd like to be able to make more clothes and starting with little pants that don't need to fit perfectly seemed like a good way to go.
How satisfying to make something useful and wearable for Amos! And to make something that turns out the way I had hoped on almost the first try (my actual first try turned out much too big, but he will be able to wear them eventually). The pattern is easy, makes one reversible pair of pants, and was a great excuse to combine fun fabrics. When I think about why I like to make things, so often I come back to the satisfaction of creating something, especially when that thing is also useful.
It has taken a long time for me to be able to take an idea and make it successfully in the first few attempts. I value the process and the learning experience that comes with so much making and I always have more to learn. Right now, though, I want to celebrate the importance of just starting somewhere. Surely there is something you have been wanting to try creating. There are always a hundred reasons to put it off or not do it at all. Sometimes these delays are unavoidable but the longer you wait, the less likely you are to take the time to use your hands and experience the satisfaction of creating.
So, in honor of spring, when nature starts fresh and begins creating everything anew, I urge you to listen to the birds, smell the sweet breezes and jump into whatever creative project you have been waiting to start.
P.S. I saw this video and love the idea of trying and working on something for 100 days. More inspiring projects here.
P.P.S. It is really hard to get a picture of Amos (and his pants) that isn't blurry because these days he is always on the move.
January 20, 2012
This Week In the Studio
Washing, ironing and cutting fabric. I made and shipped this custom order. Then I cut more fabric and matched it with other fabric for more placemats.
I love working with these beautiful fabrics and it is quite fun to choose which ones to put together.
After many placemats in the past year, I am happy to finally be very proficient at making them and I love the way they are turning out. It is gratifying to know that my work improves and that I actually have some skill at sewing.
I've been very slow at getting new items in the shop, but I plan to make that happen next week. Happy Friday!
February 3, 2011
Love to Sew: A Valentine Envelope Tutorial
I've been torn about whether to post this tutorial this week or to wait until we get closer to February 14. I hate to rush holidays but we've made it to February and I've had valentine aprons in my shop for a few weeks. I know that more often than not, holiday making can require some preparation and planning ahead. This project is quick and can be done at the last minute or as soon as you would like. These fabric envelopes have many uses, but Valentine's Day is the time for decorated cards and love notes to everyone you care about. It's good to have a project to keep you warm and cozy during this month which can be so cold and dreary.
When I was a kid, we always made a Valentine's Mailbox which we decorated with lots of pink and red and doilies. We filled with cards that we made for each other. I'm not sure if this envelope would make it through the USPS (it would be fun to try) but it is ideal for the Valentine's mailbox or hand delivery.
These envelopes are very simple and quick. There are a couple of variations which I will mention in the directions. My instructions are for machine sewing, but you could easily sew this by hand as well. As always please leave your questions in the comments or contact me directly! I definitely want you to have success with making this.
Materials:
Scissors
Fabric
Thread
Optional: a button and elastic to make a loop
a snap or velcro
1. Cut out two squares of fabric. For the first envelope I used 10 inch by 10 inch pieces and then made and envelops that was 7 by 7. The smaller you make it, the trickier it will be to sew it together with a machine, but if you want a really small one you can always do it by hand.
2. With the right sides (the printed sides that will eventually face out to make the front and the inside of the envelope) facing each other, sew around the edge of the fabric. Leave about two inches open and unstitched between where you start and finish sewing.
3. When you are done stitching it will look like this.
4. Gently reach into the opening and turn the fabric so the outside goes in. The printed side of the fabric will now be on the outside and there will be a small opening.
5. Prepare to sew up the hole. Make sure that all of the corners are completely pushed out so there is no fabric bunched inside.
6. Fold in the raw edge of each side of the opening and stitch along the edge to sew up the whole. You can sew all the way along the side that had the opening as well as one adjoining side. This will make the top flap of the envelope.
7. If you want to add any stitched designs or applique to the front of the envelope this is a good time to do it. (you can also add this before you start sewing the two pieces together, after step 1)
8. There are a few options to make the envelope stay closed. You can use a button and a loop of elastic (see 19), a snap, velcro, ribbon, or you can make a little close loop following steps 8-12 (the finished loop is shown in 18). To make this close loop, cut a piece of fabric about 4 inches by 2 inches.
9. Fold the long raw edges of the small piece of fabric into the middle and then fold the folded edges to the middle so the long cut edges are completely hidden. You can iron this flat if you wish.
10. Sew along the long open edge of the folded fabric. Then stitch along the other long edge.
11. Take the corner of your large square that has no exterior stitching on either side. Make sure the fabric you want on the outside of the envelope is facing up. Pin the small loop piece so it goes straight across the corner of the square about a half inch down from the corner point.
12. The loop piece should stick out farther than both sides of the square's corner (see 11). Fold the extra from the loop strip under the corner fabric and stitch in place. Repeat for the other end of the loop.
13. Place the square of fabric so the corner with the loop is at the bottom and the corner that has been stitched is at the top. Fold the left and right corners in to meet each other. Fold up the bottom corner and adjust as needed to make a rectangular envelope. The top corner should come down slightly past the bottom corner.
14. Once you have figured out the best way to fold up your square, pin the left corner under the bottom corner so that the two sides meet with a slight over lap.
15. Stitch along the open edge of the pinned sides all the way to the newly formed corner of the envelope. This can be a little bit tricky with a machine, just take care to make sure that you don't catch any other fabric in your stitches. You don't have to stitch all the way to the end, but just until you have nearly reached the corner. It is easy to stitch this by hand if you want to.
16. Pin the right side as you did the left and sew that in place.
17. Your envelope is now ready! This is what it will look like from the front.
18. If you made a close loop your envelope is finished.
19. If you prefer not to make the little close loop (shown in 18) you can sew a button to the bottom flap of the envelope and make a loop at the top corner to keep it closed. You can also use a snap, velcro, or any other method you would like.
20. Fill your envelope and send it off (I'm not sure if you can actually send it in the mail, although if it is stitched shut with address and stamp stitched on you might be able to, I'd like to try it soon!).
Happy Making!
January 19, 2011
New Wool Bags
I just added some wool messenger style bags to my shop. I've been wanting to make some out of wool for a while now. They are great for colder, wetter weather -- cozy to use and wear and the wool provides and extra layer to protect whatever is inside the bag from rain or snow. The first one is called Water and the second is called Earth.
I love the way lines of stitching look. I guess that is one of the reasons that I sew, because I can combine two dimensional and three dimensional art.
I am currently taking a market for makers course and I am working on improving my business as well as this blog. I have some new design ideas for this site which I am looking forward to working on. I was also wondering if you could help me with some brainstorming? Would you take a quick look at my shop and tell me three adjectives that come to mind when you look at my work? Thanks!
Subscribe to:
Comments (Atom)


