Showing posts with label tutorial. Show all posts

March 9, 2011

Reusable Fabric Bag Tutorial

reusablebag

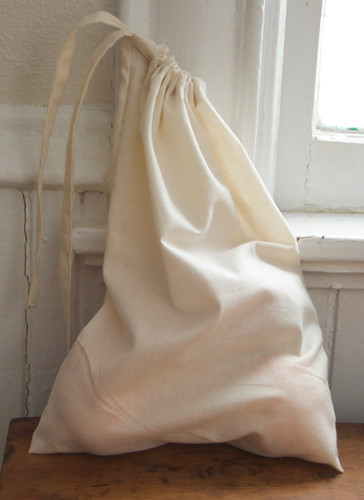
After my discussion about wasting less and enjoying more, I wanted to bring you a way to make basic reusable bags. I make these simple cotton bags for filling with grains, beans, nuts and seeds from the bulk bins at the store where I shop. I have found that it is usually less expensive to buy from bulk bins than to purchase the same items already packaged. Filling reusable cloth bags means I waste even less.

When you purchase from bulk bins, you simply fill your bag and then make note of the product number. Many bulk aisles have twist ties or stickers you can write this number on so that the cashier knows how to charge you. I sometimes use (and re-use) twist ties around my fabric bags. You can also write the number right on the fabric, or have dedicated bags for items that you buy regularly which are labeled with the number of the product. Most bulk aisles have a scale which you can use to figure out the weight of the bag. This is called the TARE and if you let the cashier know, they will subtract it from the weight of the product. Once you have tried it, it is a very simple process. If you have further questions, I'd be happy to answer them in the comments or you can ask your friendly grocery store employee.

These bags also work well for transporting fruits and vegetables, although since they aren't air tight, they aren't ideal for storing perishable produce for several days in the refrigerator (but maybe that isn't important). I also wouldn't recommend them for flours and very fine grains that can leak through the fabric. Still, they are a perfect solution for most bulk foods.

It may seem like there are a lot of steps but they are all really quick, I just wanted to give as thorough an explanation as I could. You can make the bag even simpler by leaving out the drawstring. I think the drawstring is handy, but it is really not necessary for produce or if you are going to use a twist tie. They are easily washable so you can use them again and again.

Let me know what you think!

Materials
Cotton Fabric (I usually use plain muslin, but you can use whatever you want)
Scissors
Sewing Machine (I wouldn't recommend sewing this one by hand because you want the seams to be really tightly bound together)
An iron
A large safety pin


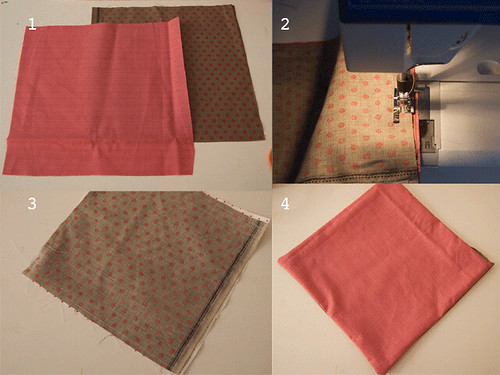
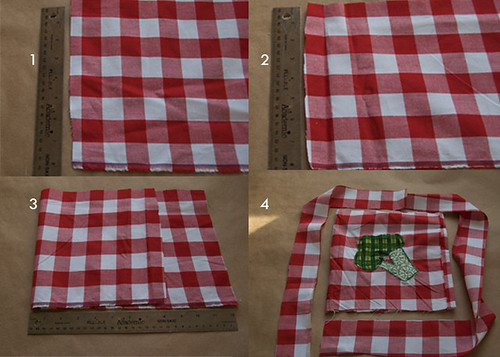
1. Fold and measure your fabric. You can make the bag any size you would like. I make all of mine about the same size so I can use them for anything, but you could make some larger and some smaller. Before you cut, fold the fabric over so that the bottom of the bag is a fold. You will sew the two sides. Folding it makes it easier to cut. I measured a rectangle about 11 by 14 inches.

2. Cut the fabric. The two sides and the top will be cut edges, the bottom of the bag will be where the fabric is folded.

3. I add applique to some of my bags. Here I cut out a carrot. You could add designs to your bags to indicate what you will using them for, or just keep it simple.

4. I appliqued the carrot to the front of the bag.


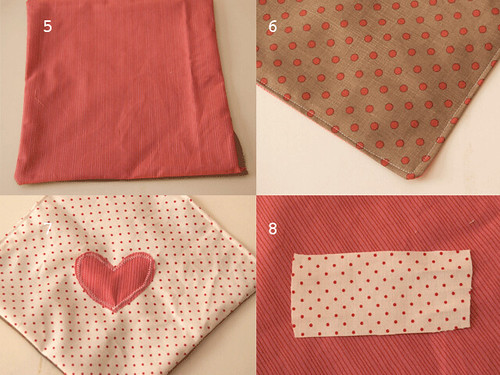
5. Now you will prepare to sew up the sides of the bag. Turn the fabric so the right sides (which will be the outside of the bag) are together and line up the top and sides of the bag. If you do not want a drawstring, simply sew along each long side of the bag, leaving about a half inch of fabric between the edge and the seam. If you want to add a drawstring, you will sew all the way on one side (with the same distance from the edge to the seam as above). On the other side you will sew from the bottom of the bag and stop about 3 inches from the top of the bag (where the opening will be).

6. Sew the edges.

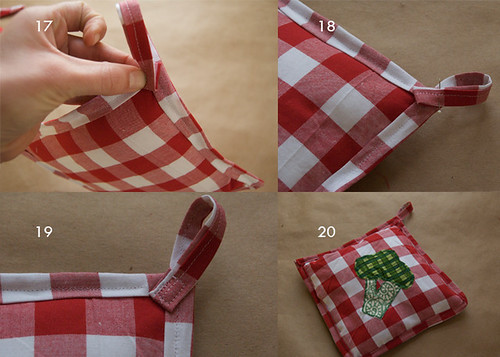
7. If you are making the drawstring, you will now have one side of the bag where the fabric is not stitched all the way to the top.

8. For the drawstring, starting on the side where the fabric is not stitched all the way, fold the top inch of fabric down and then fold it over again. Pin it all the way around to form a band of fabric at the top of the bag with no cut edges showing.

If you are not making a drawstring, then fold the fabric at the open top of the bag over twice and pin it in place. This will create a finished edge which you will sew around.


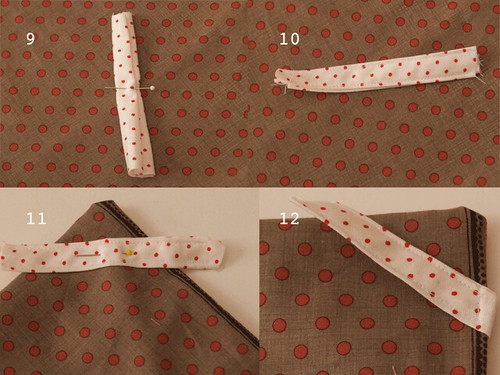
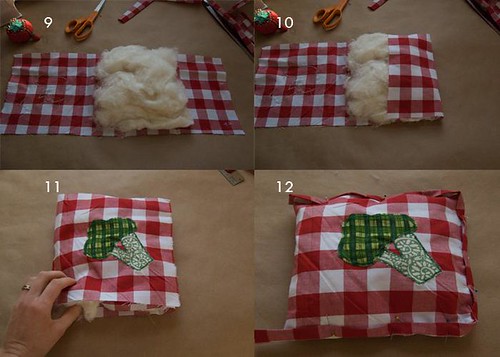
9. At the open edges of where the drawstring will go, fold the cut edge of the fabric in, hiding the raw edge.

10. For the drawstring bag, sew around the band of fabric, keeping the stitching just above the bottom fold of the band. This will create an open space for the string of the drawstring to go through.

For the open top (non-drawstring) bag, sew around the folded open edge of the bag to create a finished top.

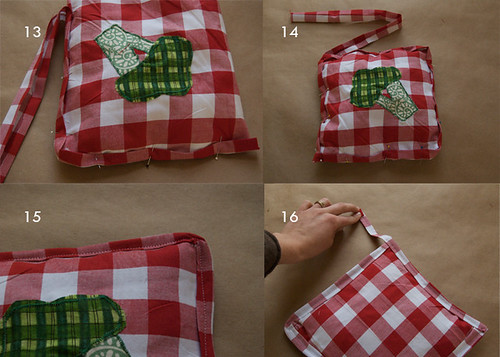
11. If you are not making the drawstring bag, your bag is finished and ready to use.

12. If you are making the drawstring bag, you now have the space that the string will go through.


13. This is what your opening for the string should look like.

14. To make the "string" for the drawstring, cut a 2 1/2 inch wide piece of fabric which is about two and a half times as long as the width of the bag (in the photo the strip of fabric is folded in half, but by looking at it I can see that it is more than twice as long as the width of the bag)

15. Fold the raw edges of the fabric strip into the middle and press flat with an iron.

16. Fold the now folded outer edges of the strip into the middle and press flat with an iron.


17. Sew along where the folded edges meet to create a solid strip of fabric with no raw edges.

18. Pin a large safety pin to the end of the fabric strip (which is now the string for the drawstring). Feed the pin through one of the holes which will hold the drawstring. Use your fingers to scoot the pin and fabric strip all the way around until it comes out the other side.

19. The drawstring is now ready to use.

20. Don't forget to take your bags with you when you go to the store or farmer's market.

If you have any questions or any of the steps could be clearer, please ask away!

February 3, 2011

Love to Sew: A Valentine Envelope Tutorial


I've been torn about whether to post this tutorial this week or to wait until we get closer to February 14. I hate to rush holidays but we've made it to February and I've had valentine aprons in my shop for a few weeks. I know that more often than not, holiday making can require some preparation and planning ahead. This project is quick and can be done at the last minute or as soon as you would like. These fabric envelopes have many uses, but Valentine's Day is the time for decorated cards and love notes to everyone you care about. It's good to have a project to keep you warm and cozy during this month which can be so cold and dreary.

When I was a kid, we always made a Valentine's Mailbox which we decorated with lots of pink and red and doilies. We filled with cards that we made for each other. I'm not sure if this envelope would make it through the USPS (it would be fun to try) but it is ideal for the Valentine's mailbox or hand delivery.

These envelopes are very simple and quick. There are a couple of variations which I will mention in the directions. My instructions are for machine sewing, but you could easily sew this by hand as well. As always please leave your questions in the comments or contact me directly! I definitely want you to have success with making this.

Materials:
Scissors
Fabric
Thread
Optional: a button and elastic to make a loop
                a snap or velcro

valentinetutorial1


1. Cut out two squares of fabric. For the first envelope I used 10 inch by 10 inch pieces and then made and envelops that was 7 by 7. The smaller you make it, the trickier it will be to sew it together with a machine, but if you want a really small one you can always do it by hand.

2. With the right sides (the printed sides that will eventually face out to make the front and the inside of the envelope) facing each other, sew around the edge of the fabric. Leave about two inches open and unstitched between where you start and finish sewing.

3. When you are done stitching it will look like this.

4. Gently reach into the opening and turn the fabric so the outside goes in. The printed side of the fabric will now be on the outside and there will be a small opening.

valentinetutorial2


5. Prepare to sew up the hole. Make sure that all of the corners are completely pushed out so there is no fabric bunched inside.

6. Fold in the raw edge of each side of the opening and stitch along the edge to sew up the whole. You can sew all the way along the side that had the opening as well as one adjoining side. This will make the top flap of the envelope.

7. If you want to add any stitched designs or applique to the front of the envelope this is a good time to do it. (you can also add this before you start sewing the two pieces together, after step 1)

8. There are a few options to make the envelope stay closed. You can use a button and a loop of elastic (see 19), a snap, velcro, ribbon, or you can make a little close loop following steps 8-12 (the finished loop is shown in 18). To make this close loop, cut a piece of fabric about 4 inches by 2 inches.

valentinetutorial3


9. Fold the long raw edges of the small piece of fabric into the middle and then fold the folded edges to the middle so the long cut edges are completely hidden. You can iron this flat if you wish.

10. Sew along the long open edge of the folded fabric. Then stitch along the other long edge.

11. Take the corner of your large square that has no exterior stitching on either side. Make sure the fabric you want on the outside of the envelope is facing up. Pin the small loop piece so it goes straight across the corner of the square about a half inch down from the corner point.

12. The loop piece should stick out farther than both sides of the square's corner (see 11). Fold the extra from the loop strip under the corner fabric and stitch in place. Repeat for the other end of the loop.

valentinetutorial4


13. Place the square of fabric so the corner with the loop is at the bottom and the corner that has been stitched is at the top. Fold the left and right corners in to meet each other. Fold up the bottom corner and adjust as needed to make a rectangular envelope. The top corner should come down slightly past the bottom corner.

14. Once you have figured out the best way to fold up your square, pin the left corner under the bottom corner so that the two sides meet with a slight over lap.

15. Stitch along the open edge of the pinned sides all the way to the newly formed corner of the envelope. This can be a little bit tricky with a machine, just take care to make sure that you don't catch any other fabric in your stitches. You don't have to stitch all the way to the end, but just until you have nearly reached the corner. It is easy to stitch this by hand if you want to.

16. Pin the right side as you did the left and sew that in place.

valentinetutorial5


17. Your envelope is now ready! This is what it will look like from the front.

18. If you made a close loop your envelope is finished.

19. If you prefer not to make the little close loop (shown in 18) you can sew a button to the bottom flap of the envelope and make a loop at the top corner to keep it closed. You can also use a snap, velcro, or any other method you would like.

20. Fill your envelope and send it off (I'm not sure if you can actually send it in the mail, although if it is stitched shut with address and stamp stitched on you might be able to, I'd like to try it soon!).

Happy Making!

November 12, 2010

Make it Yourself: A Potholder Tutorial

makeapotholder1

I've been wanting to share this simple project with you for a while. This potholder is easy to sew and very useful in the kitchen. I use mine a lot, throw them in the wash when they need it and, every so often, make a new one as the others become too worn. They also make a great handmade gift which I like to give along with a jar of preserves or salsa, and some homemade sweets or baked goods. It's a pretty simple gift that, for me, reflects things that I care about and want to share. In the next few weeks I hope to share some other ideas for handmade gifts.

As you know, I love being able to make things myself and this is another thing you can make instead of buy. It is completely utilitarian but you can make it as beautiful or simple as you want. A potholder doesn't require a lot of fabric so you can use a left over piece  that you like or choose something to match your kitchen.  You only need to be able to sew a straight stitch and, while a machine sews it up tightly, you can even sew it by hand.

I'll take you through the process step by step. The steps are arranged in groups of four. Each photo illustrating a step has a number which corresponds to a numbered instruction. This is my first sewing tutorial so if you have any questions or feedback, please let me know! Have fun creating!

Materials needed:
sharp scissors
pins
an iron
thread
cotton fabric (a piece at least 8 inches by 20 inches and one or two pieces for the binding which will equal a 3 inch by 30 inch strip)
batting - Do not use synthetic batting as it won't withstand heat. I usually use cotton quilt batting, but this time I used some bamboo fiber stuffing which I bought at a fabric store. There are insulated battings and fabrics, but cotton works just fine for normal everyday use.

potholder-tutorial

1. Measure and cut your fabric.

2. You will be making an 8 inch by 8 inch potholder so the fabric should measure 8 inches by 20 inches.

3. Since it is 8 inches by 20 inches you will fold the fabric over into an 8 inch square with 4 inches left over. The extra four inches will wrap around the batting and overlap with the top fabric.

4. The binding for the potholder will be a thin strip of fabric that goes all the way around the edges with a few extra inches for a loop for hanging. You will need either one piece of 3 inch by 30 inch fabric or two pieces that are equivalent to that length.

Once you have cut the potholder fabric, you can add an appliqued design. Applique is simply attaching fabric (which has been cut into the desired shape) on top of another fabric. I use my machine's zigzag stitch all around the edges of the shape I have cut out to keep it secured to the fabric beneath and keep the edges from fraying. It can be a bit tricky at first to stitch around complicated shapes. Just go slowly and you'll get it with practice.

potholder tutorial2

5. Make the binding tape. Taking your strip of 3 by 30 inch fabric, begin at one end and fold the outer edges into the middle. The cut edges should be facing each other and the outer edges of the strip are now at the folds.

6. Iron the fabric to keep the cut edges folded in. Continue to fold the edges in and iron them until the whole strip (or strips) is folded this way.

7. Fold the folded strip in half so that the cut edges are hidden and the two folded edges meet.

8. Iron the folded strip for a second time so that the previously folded edges meet and the whole strip is folded in half.

potholder tutorial3

9. Open up the large potholder piece of fabric. Arrange batting on what will become the back of the potholder. This will be an 8 inch square starting 8 inches from one end (this part will be the top) and four inches from the other end (this part will be the overlap). Make sure that the batting reaches the corners and edges of the square (it is okay if it is slightly larger than the 8 inch space). The batting, or stuffing, should be about an inch thick.

10. Fold the 4 inch overlap over the batting.

11. Fold the top over the batting and make sure all of the batting is tucked inside the space of the fabric. You will want the batting to come close to the edge, but it can be a little bit thinner near the edges as the binding will be going around that area.

12. Beginning with the corner that you want the potholder to hang from, pin the binding around the potholder fabric. Unfold the binding slightly and place the top fold on the top of the potholder and the bottom fold on the bottom so that the binding sandwiches the potholder fabric and covers the cut edge of the potholder fabric. Pin through all four layer of fabric to hold it together.

potholder-tutorial4

13. Continue pinning the binding all the way around the potholder closing off any open edges of the potholder fabric and making sure that binding covers the cut edges of the potholder. If you are using more than one strip of binding, when you start a new strip, fold over the cut end of the new strip and place it overlapping with the already pinned strip so there are no raw edges.

14. When you have pinned all the way around to where you started, make sure that the raw edge of the the beginning of the binding is covered by the binding as it comes back around. The binding will extend out a few inches from the potholder to become the loop from which to hang it. Note: In the photo my excess binding is much longer than it needs to be.

15. Beginning where you started pinning the binding, sew around the potholder, making sure to sew through the top binding, top of the potholder, bottom of the potholder and bottom binding (which are all pinned together) all the way around.

16. When you reach the end of the binding, continue sewing the binding tape that will become the loop for hanging the potholder. Stitch along until you reach the end of the binding.

potholder-tutorial5

17. Take the binding that will become the loop and fold it in half, tucking under the raw edge, so that it meets the corner of the potholder.

18. Pin the loop in place.

19. Sew around the tucked end of the loop to securely attach it to the potholder and keep the cut end from showing.

20. Your potholder is finished and ready to be used, gifted or hung in your kitchen!