
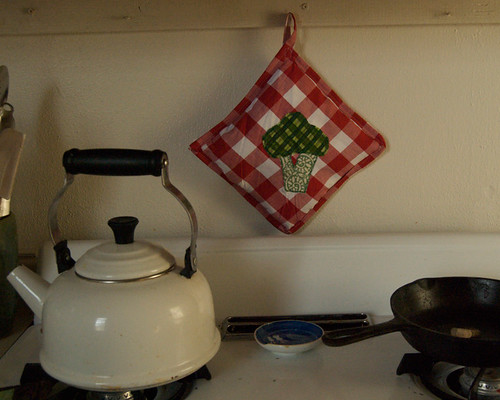
I've been wanting to share this simple project with you for a while. This potholder is easy to sew and very useful in the kitchen. I use mine a lot, throw them in the wash when they need it and, every so often, make a new one as the others become too worn. They also make a great handmade gift which I like to give along with a jar of preserves or salsa, and some homemade sweets or baked goods. It's a pretty simple gift that, for me, reflects things that I care about and want to share. In the next few weeks I hope to share some other ideas for handmade gifts.
As you know, I love being able to make things myself and this is another thing you can make instead of buy. It is completely utilitarian but you can make it as beautiful or simple as you want. A potholder doesn't require a lot of fabric so you can use a left over piece that you like or choose something to match your kitchen. You only need to be able to sew a straight stitch and, while a machine sews it up tightly, you can even sew it by hand.
I'll take you through the process step by step. The steps are arranged in groups of four. Each photo illustrating a step has a number which corresponds to a numbered instruction. This is my first sewing tutorial so if you have any questions or feedback, please let me know! Have fun creating!
Materials needed:
sharp scissors
pins
an iron
thread
cotton fabric (a piece at least 8 inches by 20 inches and one or two pieces for the binding which will equal a 3 inch by 30 inch strip)
batting - Do not use synthetic batting as it won't withstand heat. I usually use cotton quilt batting, but this time I used some bamboo fiber stuffing which I bought at a fabric store. There are insulated battings and fabrics, but cotton works just fine for normal everyday use.
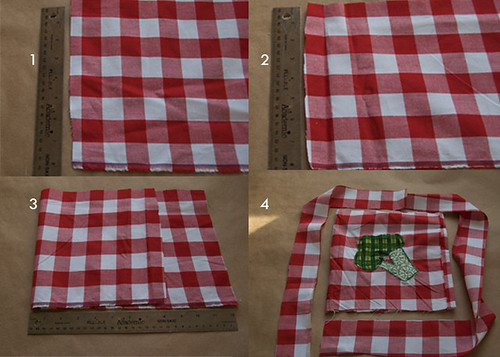
1. Measure and cut your fabric.
2. You will be making an 8 inch by 8 inch potholder so the fabric should measure 8 inches by 20 inches.
3. Since it is 8 inches by 20 inches you will fold the fabric over into an 8 inch square with 4 inches left over. The extra four inches will wrap around the batting and overlap with the top fabric.
4. The binding for the potholder will be a thin strip of fabric that goes all the way around the edges with a few extra inches for a loop for hanging. You will need either one piece of 3 inch by 30 inch fabric or two pieces that are equivalent to that length.
Once you have cut the potholder fabric, you can add an appliqued design. Applique is simply attaching fabric (which has been cut into the desired shape) on top of another fabric. I use my machine's zigzag stitch all around the edges of the shape I have cut out to keep it secured to the fabric beneath and keep the edges from fraying. It can be a bit tricky at first to stitch around complicated shapes. Just go slowly and you'll get it with practice.

5. Make the binding tape. Taking your strip of 3 by 30 inch fabric, begin at one end and fold the outer edges into the middle. The cut edges should be facing each other and the outer edges of the strip are now at the folds.
6. Iron the fabric to keep the cut edges folded in. Continue to fold the edges in and iron them until the whole strip (or strips) is folded this way.
7. Fold the folded strip in half so that the cut edges are hidden and the two folded edges meet.
8. Iron the folded strip for a second time so that the previously folded edges meet and the whole strip is folded in half.
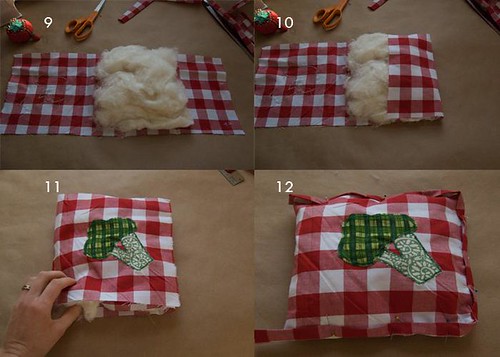
9. Open up the large potholder piece of fabric. Arrange batting on what will become the back of the potholder. This will be an 8 inch square starting 8 inches from one end (this part will be the top) and four inches from the other end (this part will be the overlap). Make sure that the batting reaches the corners and edges of the square (it is okay if it is slightly larger than the 8 inch space). The batting, or stuffing, should be about an inch thick.
10. Fold the 4 inch overlap over the batting.
11. Fold the top over the batting and make sure all of the batting is tucked inside the space of the fabric. You will want the batting to come close to the edge, but it can be a little bit thinner near the edges as the binding will be going around that area.
12. Beginning with the corner that you want the potholder to hang from, pin the binding around the potholder fabric. Unfold the binding slightly and place the top fold on the top of the potholder and the bottom fold on the bottom so that the binding sandwiches the potholder fabric and covers the cut edge of the potholder fabric. Pin through all four layer of fabric to hold it together.
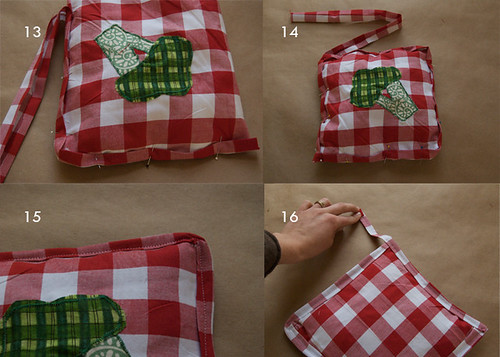
13. Continue pinning the binding all the way around the potholder closing off any open edges of the potholder fabric and making sure that binding covers the cut edges of the potholder. If you are using more than one strip of binding, when you start a new strip, fold over the cut end of the new strip and place it overlapping with the already pinned strip so there are no raw edges.
14. When you have pinned all the way around to where you started, make sure that the raw edge of the the beginning of the binding is covered by the binding as it comes back around. The binding will extend out a few inches from the potholder to become the loop from which to hang it. Note: In the photo my excess binding is much longer than it needs to be.
15. Beginning where you started pinning the binding, sew around the potholder, making sure to sew through the top binding, top of the potholder, bottom of the potholder and bottom binding (which are all pinned together) all the way around.
16. When you reach the end of the binding, continue sewing the binding tape that will become the loop for hanging the potholder. Stitch along until you reach the end of the binding.
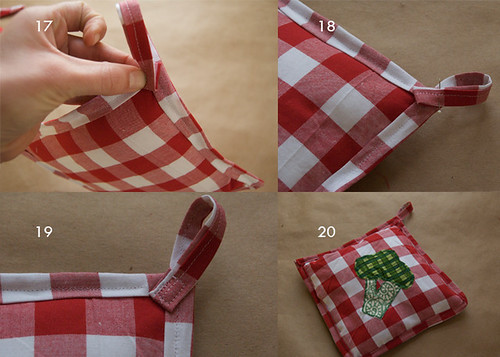
17. Take the binding that will become the loop and fold it in half, tucking under the raw edge, so that it meets the corner of the potholder.
18. Pin the loop in place.
19. Sew around the tucked end of the loop to securely attach it to the potholder and keep the cut end from showing.
20. Your potholder is finished and ready to be used, gifted or hung in your kitchen!
No comments:
Post a Comment