

I've been torn about whether to post this tutorial this week or to wait until we get closer to February 14. I hate to rush holidays but we've made it to February and I've had valentine aprons in my shop for a few weeks. I know that more often than not, holiday making can require some preparation and planning ahead. This project is quick and can be done at the last minute or as soon as you would like. These fabric envelopes have many uses, but Valentine's Day is the time for decorated cards and love notes to everyone you care about. It's good to have a project to keep you warm and cozy during this month which can be so cold and dreary.
When I was a kid, we always made a Valentine's Mailbox which we decorated with lots of pink and red and doilies. We filled with cards that we made for each other. I'm not sure if this envelope would make it through the USPS (it would be fun to try) but it is ideal for the Valentine's mailbox or hand delivery.
These envelopes are very simple and quick. There are a couple of variations which I will mention in the directions. My instructions are for machine sewing, but you could easily sew this by hand as well. As always please leave your questions in the comments or contact me directly! I definitely want you to have success with making this.
Materials:
Scissors
Fabric
Thread
Optional: a button and elastic to make a loop
a snap or velcro
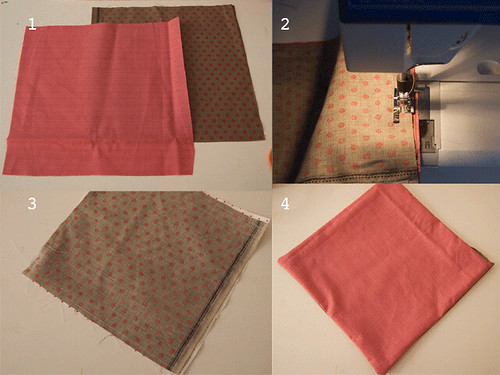
1. Cut out two squares of fabric. For the first envelope I used 10 inch by 10 inch pieces and then made and envelops that was 7 by 7. The smaller you make it, the trickier it will be to sew it together with a machine, but if you want a really small one you can always do it by hand.
2. With the right sides (the printed sides that will eventually face out to make the front and the inside of the envelope) facing each other, sew around the edge of the fabric. Leave about two inches open and unstitched between where you start and finish sewing.
3. When you are done stitching it will look like this.
4. Gently reach into the opening and turn the fabric so the outside goes in. The printed side of the fabric will now be on the outside and there will be a small opening.
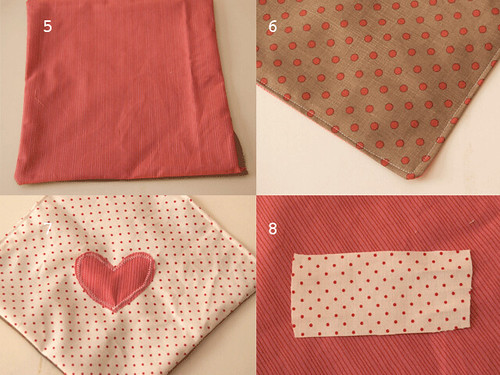
5. Prepare to sew up the hole. Make sure that all of the corners are completely pushed out so there is no fabric bunched inside.
6. Fold in the raw edge of each side of the opening and stitch along the edge to sew up the whole. You can sew all the way along the side that had the opening as well as one adjoining side. This will make the top flap of the envelope.
7. If you want to add any stitched designs or applique to the front of the envelope this is a good time to do it. (you can also add this before you start sewing the two pieces together, after step 1)
8. There are a few options to make the envelope stay closed. You can use a button and a loop of elastic (see 19), a snap, velcro, ribbon, or you can make a little close loop following steps 8-12 (the finished loop is shown in 18). To make this close loop, cut a piece of fabric about 4 inches by 2 inches.
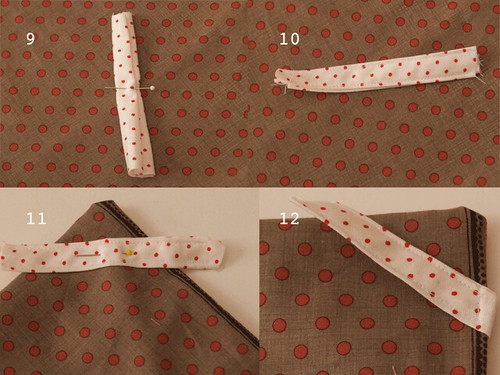
9. Fold the long raw edges of the small piece of fabric into the middle and then fold the folded edges to the middle so the long cut edges are completely hidden. You can iron this flat if you wish.
10. Sew along the long open edge of the folded fabric. Then stitch along the other long edge.
11. Take the corner of your large square that has no exterior stitching on either side. Make sure the fabric you want on the outside of the envelope is facing up. Pin the small loop piece so it goes straight across the corner of the square about a half inch down from the corner point.
12. The loop piece should stick out farther than both sides of the square's corner (see 11). Fold the extra from the loop strip under the corner fabric and stitch in place. Repeat for the other end of the loop.
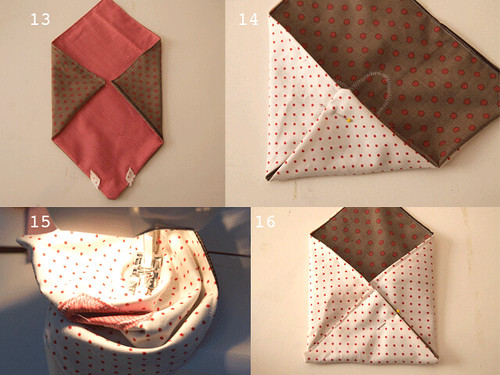
13. Place the square of fabric so the corner with the loop is at the bottom and the corner that has been stitched is at the top. Fold the left and right corners in to meet each other. Fold up the bottom corner and adjust as needed to make a rectangular envelope. The top corner should come down slightly past the bottom corner.
14. Once you have figured out the best way to fold up your square, pin the left corner under the bottom corner so that the two sides meet with a slight over lap.
15. Stitch along the open edge of the pinned sides all the way to the newly formed corner of the envelope. This can be a little bit tricky with a machine, just take care to make sure that you don't catch any other fabric in your stitches. You don't have to stitch all the way to the end, but just until you have nearly reached the corner. It is easy to stitch this by hand if you want to.
16. Pin the right side as you did the left and sew that in place.

17. Your envelope is now ready! This is what it will look like from the front.
18. If you made a close loop your envelope is finished.
19. If you prefer not to make the little close loop (shown in 18) you can sew a button to the bottom flap of the envelope and make a loop at the top corner to keep it closed. You can also use a snap, velcro, or any other method you would like.
20. Fill your envelope and send it off (I'm not sure if you can actually send it in the mail, although if it is stitched shut with address and stamp stitched on you might be able to, I'd like to try it soon!).
Happy Making!
like the tutorial...it look quite easy to make..thanks for sharing.Gift Card envelopes
ReplyDelete