December 21, 2010

DSC_0076

I am headed to the east coast today for two weeks of holidays with family and friends. I wanted to wish you a happy solstice, merry christmas, and joyful start to your new year. Thanks for being here this year, for reading and commenting and inspiring me. I am very much looking forward to 2011 and all of the new projects, ideas and possibilities that will come with it. Whatever days you may be celebrating, I hope you find plenty of light and warmth in a time of year that can be quite dark and cold. See you in a couple of weeks!

December 17, 2010

Creating and Homemade Lasagna

I haven't been doing as much sewing since I shipped the last of my custom orders on Monday. Instead, I've been finishing up handmade gifts and sending off some Christmas packages. Now that my creative work has slowed down, I realize once again how essential making is to my life.

Sometimes when I am really busy, I wish I could just take a break and stop making, but now that I'm not doing as much, I realize that I can't stop. Creating is sustenance just as necessary as food. Not creating feels like telling myself I'm not hungry and I don't need to eat. I haven't figured out how to seamlessly combine my interests in making objects (both for my shop and other projects like quilts, knitting, books) and creating the homemade foods that come from my kitchen. For me, it is all part of the handmade life that I aspire to and engage in as much as I can.

In this season of consumption, I find myself tempted to buy things until I realize that creating them myself can perfectly satisfy this urge. I sincerely wish to share the creative impulse and possibilities with all of you and in the new year I hope I can do more to inspire you to keep creating.

This final post of my handmade lasagna series has me thinking about all of this creativity and why it is so satisfying. Pasta, cheese, sauce and vegetables are all individually quite nice, but put together in a pan and baked in the oven, the resulting whole is more than the sum of its parts. I believe this to be true when making anything by hand. When I am fully involved in the process, the whole thing becomes even more than just a bite of food, it is nourishing in many ways. I can't really articulate why the act of making and creating is so important, I wish I could explain it better. If you have any thoughts or ideas about handmade and homemade, please share them in the comments.

Lasagna from Scratch

Lasagna from Scratch

If I had homegrown veggies, I would, of course use them, but I bought a selection from the store. I like to put plenty of green among the layers of red and white, but you can use any vegetables that appeal to you. I don't usually make the mozzarella cheese which covers the top of the lasagna, but I hope to share a mozzarella recipe with you soon.

Approximately 2 batches homemade sauce (depending on how much sauce you want to add, I found that one batch was not enough)
1 batch homemade pasta 
1 quart ricotta (my homemade version)
1 1/2 cups zucchini, cut into quarters lengthwise and then slices into little triangles
1 1/2 cups sliced mushrooms
2 cups baby spinach leaves
2 cups shredded mozzarella cheese

Preheat the oven to 350'. In a 9x13 inch glass baking dish, pour 1/2 cup of  sauce and spread it over the bottom of the pan. Add a layer of noodles, to cover the bottom of the dish. They don't need to overlap, but they should be almost touching so that the bottom of the dish is completely covered. Evenly distribute the zucchini over the noodles. Spread 1/3 of the ricotta over the noodles. Cover the zucchini and ricotta with sauce. Then, add another layer of noodles, with mushrooms, ricotta and sauce on top. Next, another layer of noodles, spinach, ricotta and sauce. Add the final layer of noodles and pour the rest of the sauce (or as much as you would like) over the whole pan. Top with the mozzarella. The layers will be very close to the top of the baking dish. Everything should settle as it bakes.

Cover the pan with a layer of foil and bake for about 45 minutes. If serving right away, let it cool for about 15 minutes. Lasagna is wonderfully flavorful when reheated so you can bake it ahead of time and then put it back in the oven to heat before serving. 

Makes plenty for 6-8 people

December 16, 2010

Homemade Tomato Sauce

Homemade Tomato Sauce

So, you've got some ricotta and a bunch of pasta. You could make baked ziti, ravioli, tortellini, stuffed shells, manicotti.... Whatever variation of hearty Italian meal you choose, you will surely need some tomato sauce to pour on top of it, or between the layers of pasta and cheese. Chunky, smooth, deep dark red, or quickly put together, whether it is from a jar or your grandmother's recipe, I think everyone has their own favorite sauce.

If you do have a favorite, why do you think its the best?

I wanted to share my recipe to go along with the ricotta and pasta I recently shared. Tomorrow we'll put it all together into a very homemade lasagna.

Homemade Pasta Sauce
This recipe makes plenty of sauce for 3-4 servings of pasta. I found that for a full pan of lasagna I wanted to double this recipe. 

Olive oil
1 large yellow onion, diced
2 cloves garlic, minced
3 cups crushed tomatoes (I used 2 cups of crushed tomatoes and one cup of slow roasted tomatoes
1/2 teaspoon dried basil
Salt and Pepper to taste


Place a heavy bottomed pot (at least 2-3 quart size) over medium heat. When the pot is heated, add a tablespoon or so of olive oil and the onions. Let the onions cook, stirring occasionally, until lightly browned (about 10 minutes). Stir in the garlic and let cook a couple minutes more. Pour in the tomatoes, stir to combine with the onions and garlic. Bring it all to a simmer and reduce heat to keep simmering for about 30 minutes, or to the desired thickness. Add basil, salt and pepper to taste. If you prefer a smooth sauce, you can puree it using and immersion or regular blender.

December 14, 2010

Share the Warmth of Hot Cocoa

Hot Cocoa

Sometimes a cup of hot cocoa is just the thing. A treat alongside a cookie, a cup shared with a friend, something to wrap cold hands around and be warmed inside and out. It has been so cold here and very snowy and I've been indulging in hot chocolate often.

As a child, during winter vacations I would spend hours ice skating on a nearby pond and drinking Swiss Miss by the thermos-ful. Now I like something just a little more grown up: more chocolatey, less sweet, with enough cinnamon to add flavor and a hint of cayenne for extra warmth and spice.

Hot Cocoa Mix

I made several batches of my hot cocoa mix to fill pint sized mason jars. I think they'll make great gifts for a holiday season that is all about warmth, light and joy in the middle of a cold dark time of year. If I can't sit down to a cup of hot chocolate with a friend, I can at least send my warm wishes and the ingredients to make one. Although I am keeping things simple this year, I think a unique, handmade mug with a jar of homemade hot cocoa mix would make a wonderful gift.

DSC_0087

Hot Cocoa 
I'm including the recipe that I use for just one cup, as well as the recipe for a whole jar. I have only tried this recipe with cow's milk, but I am sure that it would be just as good with whatever kind of milk you prefer. I used Equal Exchange Organic and Fair Trade Cocoa Powder which has great flavor and comes from farmer cooperatives. You can use whatever kind you like. If you want pure chocolate with nothing else in the way, omit the spices.

One Cup Mix:

4 teaspoons (7 grams) cocoa powder
1 1/2 teaspoons (9 grams) granulated cane sugar
A sprinkle of cinnamon
A small pinch of cayenne powder

Mix all the ingredients together and place in a mug. Add 8 ounces (One cup) of hot milk. Stir to blend. Serve with whipped cream or homemade marshmallows. Enjoy!

Pint Jar Mix:
1 1/4 cups (90 grams) cocoa powder
1/2 cup (108 grams) granulated cane sugar
1/2 teaspoon of cinnamon
A sprinkle of cayenne powder

Place all ingredients in a pint jar. They won't fill the jar all the way to the top. Cover and shake to combine the ingredients. To serve, add one heaping tablespoon of the mix to 8 ounces of hot milk. Serve with whipped cream or homemade marshmallows.

December 13, 2010

Homemade Pasta

pasta

I know this is a busy time of year and maybe not the season to take on another project. But then again, it is a time for special meals and expanded tables full of loved ones. Often we think of rich or extravagant ingredients during this season of celebrating abundance but sometimes just taking the time to make something from scratch can be the touch that takes a meal from every day to special.  Amidst all the hustling and bustling, it can be a blessing to slow down and make something by hand.

homemade pasta rolled

Homemade pasta is delightful in that it can be the focus of a weeknight meal or star in a more involved production such as ravioli or lasagna. I'm not sure why I highlight pasta for special occasions -- I am just remembering a snowy cold New Year's Eve two years ago when I organized a house full of guests in a grand ravioli production. Everyone had a lot of fun, ending in a delicious meal. The first Christmas Ray and I spent together was the occasion of my first lasagna from scratch and I've helped my mom put together many lasagnas for her annual Christmas parties.

I guess my association with homemade pasta tends toward the fancy and festive, but I am most happy to share this recipe because it makes for a hearty and wholesome meal anytime. It is certainly not as quick as throwing some dried pasta in boiling water, but the extra time is worth it for the flavor and texture of freshly made pasta. I like it tossed with pesto, covered in sauce, layered in lasagna, or stuffed for ravioli. I make my pasta with half whole wheat, half white flour. You can use all white flour, if you prefer, but I think the wheat adds greater flavor and texture.

I'll share my sauce recipe later in the week.

homemade pasta

Fresh Pasta 

2 cups flour (or one cup all purpose flour and one cup whole wheat flour)
2 large eggs
1 tablespoon olive oil or water (or more as needed to make a pliable dough)
1/4 teaspoon salt 

Place the flour and salt in the bowl of a food processor or in a mixing bowl. Add the eggs one at a time and mix to combine. Gradually, add the olive oil. If you are mixing in a food processor, when the ingredients are fully incorporated gather them into a ball of dough and knead a couple of times. In the mixing bowl, knead the dough to incorporate as much of the flour as possible. In either case, if the dough is dry and not holding together well, add a tiny bit more water until you can form a smooth and slightly pliable ball of dough. Cover, and let rest for 15 minutes.

Divide the dough into five equal pieces. Use your hands to press the dough into a thin disk. If you are rolling by hand, roll it as thin as you can and then fold it over on top of itself. Continue to roll and fold until the dough is smooth. Then, roll the dough out as thin as you wish (the thickness of a penny or thinner is ideal). Once you have reached the desired thickness, you can cut the sheet of dough into smaller strips or squares for cooking. If you want to use it for lasagna, you can cut it into strips about 4 inches wide and as long as the pan you will be using. Repeat this with the rest of the dough.

If you are using a machine to roll out your dough, press it as thin as possible with your hands. Starting with the widest setting, roll the dough through. It may crumble at first, but keep rolling it through and putting it back together until the dough is smooth. Then move to the next smaller setting. Roll the dough through, fold it in half and roll it through again. Once it is totally smooth, you can decrease the settings and roll it only once. I usually go to setting 6 or 7 (the smallest setting on mine is 9). Repeat this with each piece of dough.

Before you cut your dough into the desired shapes and lengths, lay it carefully on a clean dishtowel or drape it over a dishtowel on the back of a chair. The pasta sheets can stick to each other if they are damp and overlapping. They can also easily dry out, so I separate them slightly and cover them with a damp dishcloth.

Cooking the Pasta:
Bring a large pot of water to a rolling boil. You will want a pot large enough so the pasta is not crowded and sticking to each other (for this recipe I used a seven quart pot which left plenty of room). Add a few teaspoons of salt to the water to flavor the pasta. Gently place the pasta in the boiling water and carefully stir it to keep the noodles from sticking to the pot or to each other. Fresh pasta cooks very quickly -- it is best to pull a piece out and taste it (run it under cold water so you don't burn your mouth) after a couple of minutes. When the pasta is done, you can drain it into a colander or scoop it out with a strainer or slotted pasta spoon. If you are not eating it right away (like noodles for lasagna) run cold water over the pasta in the colander to keep it from continuing to cook or sticking. If you are eating it right away, you can scoop it onto plates or add it directly to the sauce. 


Yields enough pasta for a 9x13 inch pan of lasagna or 4 large servings of pasta.

December 9, 2010

Homemade Ricotta

Homemade Ricotta Cheese

Have you ever made cheese? It is one of those delicious foods that for many comes from a store or maybe from a farm that carefully transforms milk of its cows, sheep or goats. I did a brief stint as a an apprentice cheese maker at a small creamery in Maine. We wore rubber boots, hairnets, and rubber aprons and worked in an incredibly steamy and very well sanitized environment. The milk was pumped into a vat that held a few hundred gallons and with the help of enzymes, heat, and lots and lots of stirring and mixing it became cheese. It also took pressing, washing, aging, cutting and packaging to get it ready for eating.

My experience at the creamery made me fairly certain that I will never be an artisan or commercial cheese maker, but I am still interested in making cheese on a small scale in my home. I do dream of someday having a couple of goats and using their milk to make cheese and feed my family. So far my home cheese making has been limited to simple soft cheeses but this is a good place to start.

Making Ricotta

Ricotta cheese is even easier to make than yogurt. Traditionally it is made with the whey left over from making a hard cheese. The whey is fermented and then the remaining proteins fuse together to make the curd. I haven't tried making traditional ricotta yet, but I have made simple ricotta from milk many times. The recipe doesn't require any fancy tools or ingredients and you can have a fresh, soft cheese in very little time.

Ricotta goes well with pasta, on pizza, in pancakes, in cookies and cheesecakes, with honey and fruit. There are so many ways to use and enjoy homemade cheese. I most often make ricotta for my homemade lasagna. I don't make lasagna frequently, but when I do, I like to make it almost entirely from scratch. Ricotta, pasta and sauce are three elements that can be simply made in your kitchen and used in endless combinations and dishes. So, I thought we could make a lasagna together. Today I'm sharing the recipe for ricotta, I'll post the pasta and sauce recipes next week, and then we'll put it all together into a warm and hearty homemade dish. If you have any suggestions for your favorite lasagna ingredients or techniques along the way, please share them in the comments.

Making Ricotta Cheese

Whole Milk Ricotta
One of the best resources I have found for home cheese making is New England Cheesemaking Supply I bought a starter kit from them a while back which is the basis for this recipe. The kit includes citric acid powder which can be used as the acid that forms the ricotta curds. You don't need citric acid, though, white vinegar works just fine. If you don't have cheese cloth, you could use a clean dishtowel --one that will let the whey through but not the curds.

1 gallon whole milk (its great if you can get local or organic milk)
3 tablespoons white vinegar or 1 teaspoon citric acid  dissolved in 1/4 cup cool water
1 teaspoon of salt (you don't have to add salt, however it does give the cheese more flavor)

Pour the milk into a large, heavy bottomed pot. Add the vinegar or citric acid and stir to distribute throughout. Over medium high heat, bring the milk to 185' to 195' degrees. Stir frequently to prevent the bottom from scorching. If you don't have a thermometer, you will know that you have reached the right temperature when it is steaming hot but not boiling. At this point, the curds will separate from the whey. The curds will be the soft but solid masses surrounded by the liquid whey. Before you reach 185', some of the curds will separate but you can tell that the cheese is forming when the liquid in the pot is more translucent and no longer perfectly white. At this point, turn off the heat and let set for about 10 minutes.

Meanwhile place a colander in the sink and line with cheesecloth or a clean dishtowel. When they are done setting, gently scoop the curds in to the cheesecloth lined colander and allow to drain to the desired consistency. I don't usually drain them for more than 15 minutes so that they are still somewhat soft. The left over whey can be used for liquid in bread making or lacto fermenting. Some people even like to drink whey.

The recipe yields about a quart of ricotta and will keep refrigerated for 1-2 weeks.

P.S. Dana Treat is doing a giveaway of one of my aprons. I love her blog and all of her great recipes, and I'm honored to have my work featured there.  

December 6, 2010

Festive Holiday Garland Tutorial

holidaygarland1

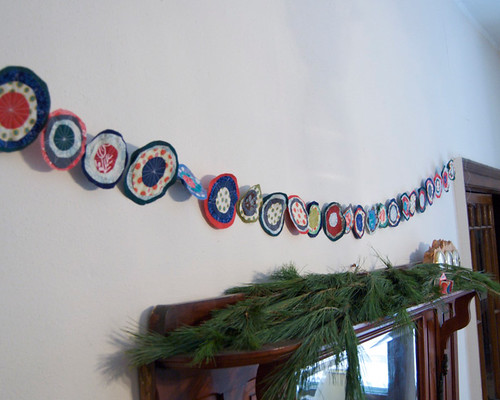
I made this festive garland and I wanted to share. I started making these multicolored circles as ornaments that would hang alone. When I saw them all together I wanted to keep them this way. The great thing about this project is that I used scrap fabric to make it. I love mixing bright colors and patterns, but you could also use varying shades and patterns of one color. Or you could combine a couple of colors like red and green, gold and white or blue and silver.

You could put this garland on a tree or hang it anywhere that needs a bit of festivity.

Materials:
Fabric, in various colors or patterns
Scissors
A sewing machine
A sewing needle
Heavy duty thread for stringing the garland, upholstery or quilting thread works well


 holidaygarlandtutorial1

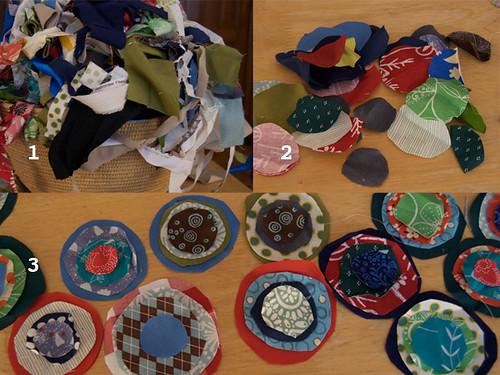
1. I save all of my scraps from making other things and I have plans for a few projects in mind to use them. For this project, I chose pieces that were big enough to cut large circles (about 4 inches in diameter) and three smaller sizes.

2. Cut the circles in a variety of sizes. There is no need to measure, but just make sure that there are approximately four different sizes.

3. Match up the circles. I chose to give each one four layers, starting with the largest and making sure that each circle is about a quarter of an inch smaller than the one on top so you can see each layer of fabric.

garlandtutorialsewing

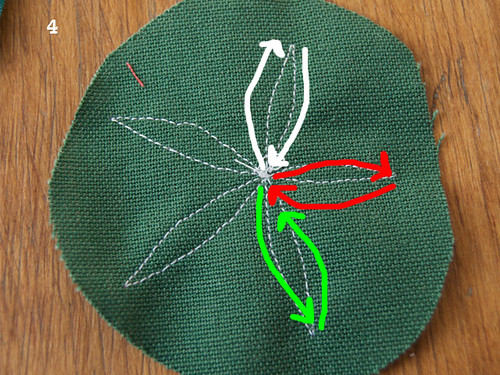
4. Sew the circles together. The back of this one shows the sewing pattern, but, to keep all the circles lined up, I sewed them from the front. You can use whatever method of attaching the circles together that you want. A simple stitch in the middle will hold them together. However, I liked sewing them together in a star pattern. It binds the layers together smoothly and adds another element of design to each piece.

To sew in this pattern, start in the middle of the smallest circle. Sew out toward the edge of the second largest circle. From there, turn and sew back toward the middle. Repeat this as few as three times or as many as five to make this star shape and completely bind the circles together.

holidaygarlandtutorial3

5. A few examples of the way that I sewed the circles together. On the larger circles I often made more than five points. It is not necessary, just a bit of design. Finish sewing all of your circles together before putting them together as a garland.

garlandtutorial4

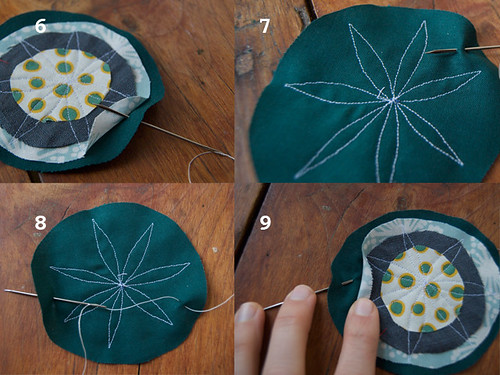
6. Now its time to put all of the circle pieces into a garland. Using your needle and thread, start on the edge of the first circle. You can hide the stitching, by poking the needle into the biggest circle's fabric under the second largest circle. Choose a spot on the upper half of the circle (once the circles are stitched onto the thread, they will be able to move, to keep them from falling forward, you want to stitch through the upper half of the circle). Holding the circle so the side with all the layers is facing you, poke the needle through the back to the front.

7.Then, poke the needle toward the back. Pull the thread through the two holes.

8. Find a spot across the circle from the other needle holes and sew to the other side (in the photo the upper half of my circle is on the bottom, until I flip it over in step nine).

9. The needle is poking through to the front of the circle. Poke it through to the back of the circle again.

garlandtutorial

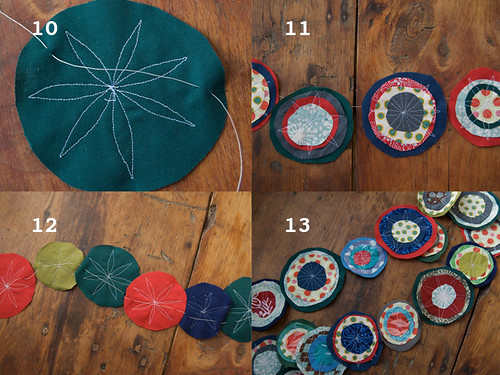
10. Here, you can see the way the stitching will look from the back.

11. Continue stitching circles onto the thread, sliding them down the thread as needed, until all of the circles are attached to the thread.

12. They look pretty, like Christmas lights or balls from the back.

13. Once all of the circles are stitched onto the thread, you are ready to hang your garland. Make sure to leave plenty of thread on both ends to hand it from. The circles can slide closer or farther from each other as needed.

holidaygarland

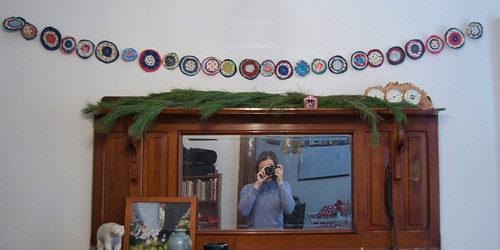
I hung my garland over the mantle in our living room, with some pine boughs, it's looking quite festive.

December 2, 2010

Further Progress

DSC_0141

I'm reaching the home stretch in creating for the craft fair on Saturday and on my big pre-holiday push. Now I just have to make some gifts for friends and family. I wanted to share a few more shots of progress, sometimes I enjoy the look of the fabric and the stitching as much as I do the final product. They are so different, but very much connected.

DSC_0142

I love the aesthetic of stitches on fabric and would like to incorporate it more into my work.

DSC_0209

grayvinemessenger

I finished these bags as well as a few others. Three of them are up in my shop and depending on how much I sell this weekend there will be more things in the shop on Monday. Next week I will also begin sharing more projects and recipes. Until then, Happy December!